Released Boxstarter 2.3: Windows Azure integration by Matt Wrock

Just a month after releasing integration with Hyper-V, I am pleased to announce support for auto connection configuration and first class Checkpointing in Windows Azure VMs. Boxstarter can now make cloud provisioning of your boxes a straight forward process.

What does this do?

For readers unfamiliar with Boxstarter or Chocolatey, this makes the provisioning of Azure VM’s with all of the tools, applications, settings, patches, etc that you require a simple and repeatable event. If you spend much time building out VMs, tearing them down and then rebuilding them again and again, please stop immediately. Create a Chocolatey package to define your server’s end state and let Boxstarter push it out.

What I have just described can be accomplished on a local physical box, a remote physical box or a VM. Below I will describe the features in this release that apply specifically to the newly released Azure Integration.

Auto Connection Configuration

Boxstarter uses Powershell remoting to initiate provisioning. By default, Azure enables Powershell remoting on all of its Windows server VMs. However, there are a few not so obvious steps involved to make a connection to the VM. Boxstarter will locate the DNS name of the VM and the WinRM port listening for remoting connections. Boxstarter will also download the SSL certificate on the machine and install it locally. This allows Boxstarter to make a secure connection with the VM and invoke the provisioning of your server.

Checkpoints

If you are familiar with almost any popular VM technology, you are certainly familiar with checkpointing (also known as Snapshots). This is the ability to save the state of the VM at a particular point in time and later restore to that point. Unfortunately Azure VMs do not easily expose this same functionality. You can create SysPrepped images in the portal, attach and detach disks, but there is no clear and simple way to take and restore a checkpoint let alone several checkpoints.

Boxstarter makes this possible by leveraging Azure Blob Snapshots under the hood and exposing this via four commands:

  • Set-AzureVMCheckpoint
  • Get-AzureVMCheckpoint
  • Restore-AzureVMCheckpoint
  • Remove-AzureVMCheckpoint

Each of these take a VM and CheckpointName parameter. Just like the Hyper-V integration, Boxstarter can create and restore checkpoints as part of the provisioning process since you may want to take or restore a checkpoint just before provisioning begins. For more information regarding their usage, please view their commandline help or visit Boxstarter.orgs Azure documentation page.

Case Study: Provision a public Minecraft server

You and your friends have decided to play homage to your local NFL team’s upcoming Superbowl challenge by constructing a replica of the team’s arena within a Minecraft landscape. You need a server that everyone can connect to and contribute as time permits. It’s a common cloud deployment scenario. We’ve all been there.

Step One: Get the Boxstarter.Azure module

The Boxstarter.Azure module does not install along with the core Boxstarter bits. To download and install it along with all of its dependencies, run:

CINST Boxstarter.Azure

Note: You will need to be running at least Powershell version 3. You can run:

$Host.Version

at any powershell console to determine your version and if you are running a previous version, you can install Powershell version 3 or 4 via Chocolatey.

Now, for best results, open the Boxstarter Shell to run the rest of this sample.

Step Two: Configure your Azure subscription

There is a one time configuration step required so that the Azure Powershell commands know which account to manage and also know that you are authorized to manage it. This step includes running three commands:

Get-AzurePublishSettingsFile

This command will launch your default browser and initiate a Publisher Settings download. First you will land on the Windows Azure sign in page and as soon as you successfully authenticate, the download will begin.

Now simply import the file that was just downloaded:

Import-AzurePublishSettingsFile -PublishSettingsFile C:\Users\Matt\Downloads\Subscription-1-1-19-2014-credentials.publishsettings


Finally, specify the name of the storage account you want to use. You can run Get-AzureStorageAccount for a list of all of your storage accounts.

Set-AzureSubscription -SubscriptionName MySubscription -CurrentStorageAccountName MyStorageAccount

Note: Boxstarter will attempt to set your Current Storage Account for you if it has not been specified. However, you will need to run the command yourself if you need to run other Windows Azure Powershell commands prior to using Boxstarter.

Thats it. You can now use the Windows Azure Powershell and Boxstarter commands to provision VMs in Azure.

Step Three: Create the Azure VM

$cred=Get-Credential AzureAdmin
New-AzureQuickVM –ServiceName BoxstarterTest1 -Windows -Name MyVM `
  -ImageName 3a50f22b388a4ff7ab41029918570fa6__Windows-Server-2012-Essentials-20131217-enus `
  -Password $cred.GetNetworkCredential().Password -AdminUsername $cred.UserName `
  -Location "West US" –WaitForBoot

This uses the Azure Powershell module to create a new Cloud Service and a new small VM with Server 2012 R2 in Azure’s West US data center which just so happens to reside relatively near your football team. How convenient. Ehh…maybe not. But it is a pretty neat coincidence. Note that if you are reusing an existing Cloud service in the command above, you want to omit the –Location argument since the location of the existing service will be used.

Step Four: Create your Chocolatey package

Getting a Minecraft server up and running is really pretty simple. Here is the script we will use:

CINST Bukkit
Install-WindowsUpdate –AcceptEula
New-NetFirewallRule -DisplayName "Minecraft" -Direction Inbound -LocalPort 25565 -Protocol TCP
-Action Allow
Invoke-WmiMethod Win32_Process Create -Args "$env:systemdrive\tools\bukkit\Bukkit.bat"

This installs Bukkit, a popular Minecraft server management software which will also install the Java runtime. It will install all critical Windows updates. Then we allow inbound traffic to port 25565, the default port used by Minecraft servers. We will save this in a Gist and use the RAW gist url as our package source. The Url for the gist is:

https://gist.github.com/mwrock/8518683/raw/43ab568ff32629b278cfa8ab3e7fb4c417c9b188/gistfile1.txt

Step Five: Use Boxstarter to provision the server

$cred=Get-Credential AzureAdmin
Enable-BoxstarterVM -provider Azure -CloudServiceName BoxstarterTest1 `
  -VMName MyVM -Credential $cred –CheckpointName Fresh | 
    Install-BoxstarterPackage `
     -PackageName https://gist.github.com/mwrock/8518683/raw/43ab568ff32629b278cfa8ab3e7fb4c417c9b188/gistfile1.txt

This creates a connection to the VM and runs the installation script on that server. This may take a little time and is likely to include at least one reboot.

Step Six: Create a new Azure endpoint for the Minecraft port

$vm = Get-AzureVM -ServiceName BoxstarterTest1 -Name MyVM
Add-AzureEndpoint -Name Minecraft -Protocol tcp -LocalPort 25565 -PublicPort 25565 -VM $vm | 
  Update-AzureVM

This is necessary so that traffic can be properly routed to our server.

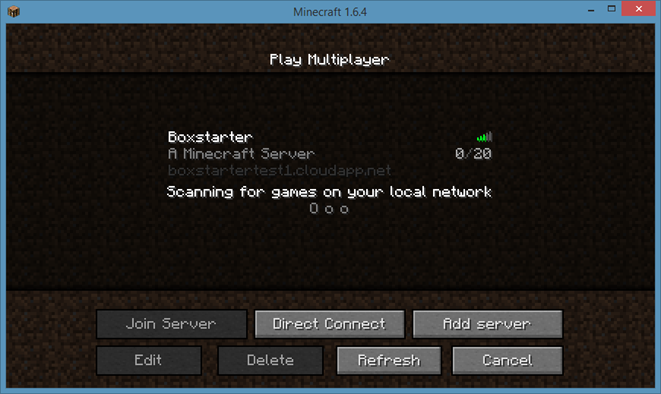
Thats it, fire up Minecraft and connect to our server.

image

Other new features worth mentioning

Enable-MicrosoftUpdate and Disable-MicrosoftUpdate

The credit to these new functions goes to Gary Ewan Park (@gep13) who contributed both. Thanks Gary!! This adds the ability for windows to update many Microsoft products beyond just windows. It essentially toggles this:

image


The Boxstarter Shell

Especially if you are not comfortable with Windows PowerShell, you may prefer to use the Boxstarter Shell to run Boxstarter commands. The Boxstarter Shell will make sure that the user is running with administrative privileges, the execution policy is compatible and all Boxstarter PowerShell modules are loaded and accessible. This shell also prints some basic "Getting Started" text at startup to assist you in running your first commands.

Visual Studio Installations: The 15 minutes you will never see again. Don’t do it. Have Chocolatey do it for you. by Matt Wrock

image

For the .Net developer, reinstalling Visual Studio is not far from repaving your machine. Its something almost all of us has had to do. No doubt it gets faster in every version. I remember when VS 2003 would take hours and you had to sit there looking at goofy model engineers and read scrolling marketing text. I already bought the damn product. If you are so awesome why am I sitting here completely unproductive?! Thank god those days are gone, but it still takes a lot longer to install than Minecraft.

About 18 months ago, I joined a new team where we had to work against new Visual Studio builds and reinstalling Visual Studio was AT LEAST a weekly event. I then hunkered down and looked into how to install Visual Studio unattended. Then I created Chocolatey packages for it.

Chocolatey, here to save you from the tyranny of Next…Next…Finish

Look. Just finish. I don’t do Next anymore. There is nothing of value at Next.Its simply a passing, transient WPF form standing between where you are now and your ability to deliver something awesome.

Chocolatey is a great tool every Windows dev and power user should have. Here is how it works:

  1. I need a tool, lets say fiddler for inspecting HTTP traffic.
  2. I pop open a command prompt and type CINST fiddler
  3. I do something else for a minute.
  4. I have fiddler installed and ready to run.

Chocolatey has almost 1500 software packages that follow this same model. Most are dev tools so the chances are that your tool is in the public Chocolatey feed. You are wasting your time going to the web and searching for a GIT download and reading up on how to install it. Just type CINST GIT and be done with it.

Getting Visual Studio with Chocolatey

Since there are different Visual Studio SKUs (Ultimate, Professional, etc.), there re separate Visual Studio Chocolatey Packages for each. I have created packages for most of them covering versions 2012 and 2013. Go to Chocolatey.org and search for “visual studio ide”. You will see a bunch of them.

If you have Chocolatey, simply run:

CINST VisualStudio2013ExpressWeb

That’s it. Give it 10 to 20 minutes and you have it. Oh you wanted Resharper too? Quit your crying and enter: CINST resharper.

How do I pay for the Non-Express SKUs?

If you work with the professional or ultimate Visual studio SKUs, you likely have the product key. Install Visual Studio via Chocolatey and you will be prompted for your key upon first use. I believe (I could be wrong here) that you have 30 days to enter the key.

How do I specify the Visual Studio features I want installed?

The non-express skus all have at least a half dozen features you can add to the initial download and install. These include some very valuable features like the Web Tooling that brings in CSS and Javascript editing goodness. By default, a Chocolatey flavored Visual Studio install does not install any of these. Most people want either none or just one or two. However, as of today, I have added support for specifying optional features in the Chocolatey install command. It leverages the –InstallArguments parameter. Here is an example:

cinst VisualStudio2013Ultimate -InstallArguments "WebTools Win8SDK"

This installs both the Web tooling features and the Windows 8 Store Apps SDK. Here are all of the available feature names:

  • Blend
  • LightSwitch
  • VC_MFC_Libraries
  • OfficeDeveloperTools
  • SQL
  • WebTools
  • Win8SDK
  • SilverLight_Developer_Kit
  • WindowsPhone80

I didn’t make these names up. They come from the AdminFile SelectableItemCustomization strings.

Uninstalling and Reinstalling

Sometimes we want to start over from scratch and with Visual Studio, the uninstall is not much faster than the install. So that is nice to script as well and Chocolatey has you covered here. The Visual Studio 2013 packages come with uninstallers. So if you wanted to say uninstall and then reinstall in one script, it would look like this:

CUNINST VisualStudio2013Ultimate
CINST VisualStudio2013Ultimate

The uninstaller looks through your installed MSI packages for the correct uninstaller and invokes it with instructions to run passively.

Visual Studio loves Rebooting

Here again, things are much better than they were years ago. One can typically install an Express or optionless install of Visual Studio never needing to reboot. However, once you start adding features, in addition to perhaps installing the .Net framework, SQL Server and on and on, a reboot (or a couple) becomes nearly inevitable.

In these cases check out Boxstarter. That’s my little project and I’m proud to say both it and Chocolatey were given a mention in Scott Hanselman's 2014 Ultimate Developer and Power Users Tool List for Windows. Boxstarter provides an environment for invoking Chocolatey packages that is reboot resilient. It also allows you to run them on remote machines and Hyper-V VMs. Have a couple VMs that need Visual Studio? Run:

$c=Get-Credential administrator
"VM1","VM2" | 
Enable-BoxstarterVM -Credential $c -Checkpoint BareOS |
Install-BoxstarterPackage -PackageName VisualStudio2013Ultimate –Force

This will run the VisualStudio installer on Hyper-V VMs named VM1 and VM2. If there are pending reboots before the install, Boxstarter will reboot the VM. If you need to install multiple packages (maybe SqlServer and the IIS Windows Feature), Boxstarter will check for pending reboots before each package. There is lots of information on running Boxstarter at Boxstarter.org.

Save disk space and store your VHDs on an SD card by Matt Wrock

About a year ago, I puchased a Lenovo X1 Carbon laptop as my primary personal dev machine. I absolutely love it! Almost inappropriately so…almost. The only thing I wish it had was more disk space. I settled for the 128GB SSD. The upgrade to 256GB was just too much of a price jump for me. I think 128GB is likely fine for most folks but I work a fair amount with VMs and those guys can be hogs. My disk would occasionally fill up and I’d find that the majority of space was taken up by my VM’s VHD files.

SD Card Readers are becoming commonplace in modern laptops

Well it so happens that there is a small hole in this laptop that can be filled with an SD card. I hadn’t used one of those in years when I used to have a camera that lacked a phone so it was something I had overlooked. These can accommodate a variety of capacities. The largest that I have seen is 256GB but at a cost of about $900.00. More commonly found and affordable cards range from about 16 to 64GB. So I figured if I could put my VHDs on one of those, I’d get a 50% boost in hard disk capacity. The placement of the drive is convenient too. Unlike a USB thumb drive. SD Cards don’t stick out but can go unnoticed fully nuzzled in the side of my laptop.

Initial performance was abysmal

I forked out 50 dollars for a Lexar 64GB SDXC Class 10 U1 card. I was unsure how these cards would perform compared to my SSD. Its one thing to read the specs which typically include “MAX” MB/s speeds, but another to see how something will work under my particular workloads. Obviously if it was going to be slow, this would not be a workable option for me. It was really super slow.

For many this will come as no surprise. My SD card is rated at 60MB/s for Reads and less (not sure what the write rate is) for writes. You can get cards that are much faster but in my interest of keeping costs down, the higher speed cards were not a viable option. My VMs took a long time to boot. I wrote it off and figured hopefully I’ll find another use for the lost 50 bucks.

Differencing disks on the SSD to the rescue

Then a couple weeks later I had an idea. I cant remember what made me think of it but I wondered if I created differencing disks from my base VHDs and put those on my SSD and the parent VHDs on the SD card, what would performance be like. With this setup, the SD would only be accessed for reads (which it excels at over writes) and all writes would go to my SSD. I gave this a shot and the performance pretty much felt the same as it had been when running entirely on my SSD. I should have done a better job of collecting hard numbers but I didn’t so this is simply how it “felt”.

As far as space goes, all 5 of my base VM VHDs consume about 60GB of my SD so I am certainly saving space. I used to often go into the red with just a few gigs or less remaining on my SSD. I always have plenty of space since switching t this configuration a couple months ago. My differencing disks consume much less space and almost consume nothing when I revert my VMs to their initial state which I do often.

Your mileage may vary

Of course everyone’s workload and I/O patterns will vary. What is working for me may very well perform horribly for you. If you have an empty SD reader and are finding yourself often crunched for disk space, it may be worth considering this configuration.

Easily test Chocolatey package development with Boxstarter 2.2 Hyper-V integration by Matt Wrock

Hyper-VA couple weeks ago I released Boxstarter v2.2. The primary feature added is the ability to target Hyper-V VMs. Boxstarter can automatically configure them without any manual setup and can both save and restore checkpoints. You can learn about the details here. I’d like to give a big thanks to Gary Park (@gep13) for providing early feedback and helping me catch some holes I needed to fill in to make this release a better user experience. I’m sure I have not identified the last of them so please, create an issue or discussion on the Codeplex site if you run into issues.

This post will discuss how you can use this new feature to greatly reduce the friction involved in Chocolatey package development or in the creation of Boxstarter-style chocolatey packages to develop Windows environments leveraging Hyper-V VMs. No additional Windows licenses will be required. More on that later.

NOTE: Both the Boxstarter.HyperV PowerShell module and Microsoft’s Hyper-V module require PowerShell version 3 or higher on the VM host. This is automatically available on Windows 8 and server 2012. On Windows 2008 R2, it can be installed via the Windows Management Framework.

Integration testing for Chocolatey packages

When you are authoring a Chocolatey package, you are likely creating something that changes the state of the machine upon which the package is installed. It may simply install a single piece of software or it may install several pieces of software along with various dependencies and possibly configure services, firewall port rules, IIS sites, databases, etc. As the package author you want to make sure that the package can run and perform the installation reliably and repeatably and perhaps on a variety of OS versions. This is almost impossible to test directly on your dev environment.

You want one or more virtual environments that can be started in a clean state that mimics what you imagine most others will have when they download and install your package. Furthermore, as you work out the kinks of your package, you want to be able to start over again and again and again. Virtual machines make this workflow possible.

Hyper-V VM technology, there is a good chance you already have it

There are lots of great VM solutions out there. Besides the cloud solutions provided by Amazon, Microsoft Azure, Rackspace and others, VMWare, Hyper-V and Virtual Box are some very popular non cloud options. Hyper-V is Microsoft’s solution. If you have Windows 8 Pro or greater or Windows 2012 or 2008 R2, this technology is available to you for free. I run Windows 8.1 Pro on a Lenovo X1 laptop with 8GB and can usually have 3 VMs running simultaneously. It works very well.

Simply enable the Hyper-V features on your machine either using the “Turn Windows features on or off” GUI
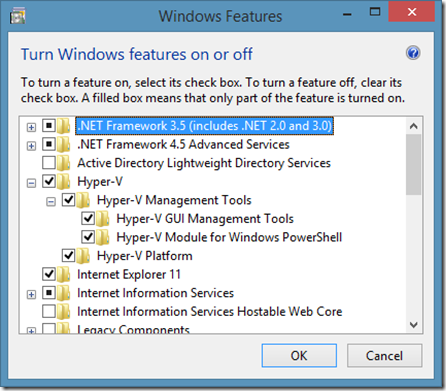
image

or from a command line running:

dism.exe /Online /Enable-Feature:Microsoft-Hyper-V /All
dism.exe /Online /Enable-Feature:Microsoft-Hyper-V-Management-PowerShell

Creating the VM

The first thing you need to do is create one or more VMs to reproduce the environment you are targeting. Developing Boxstarter, I have 5 VMs:
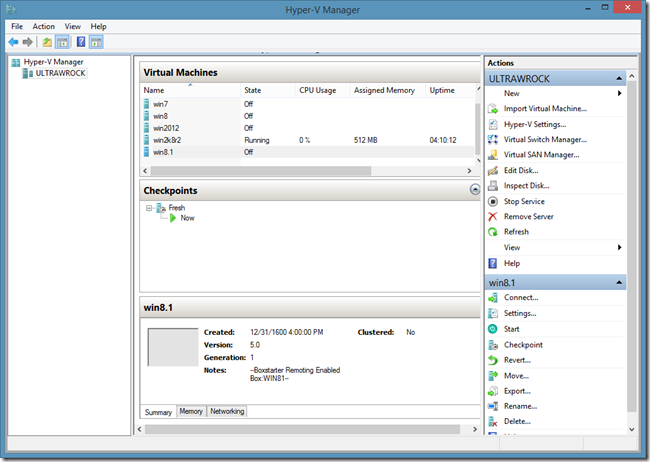
image

I have one for every Windows version I care to test on. I save the VM with a base os install with no configuration tweaks other than maybe changing the computer name and adding a admin user. I want to have Windows with the default settings. The first thing you need to get started creating a VM, is a VHD. That is the file type that Hyper-V uses to store the machine. That’s really all a VM is. It’s a file. It can get much more complicated with different VHD formats, differencing disks, Fixed disks, Dynamically growing disks, etc. I’m not going to get into that here and it is not necessary to understand for what I’m going to show you. However if you find yourself working with VMs a lot and want to learn how to maintain them efficiently, you will want to look into those details.

There are two main ways that I typically create a clean Windows VHD:

Create a new VHD and mount a Windows Install ISO as a DVD drive

If you have a Windows installation ISO file, you can mount this to the VM as a virtual DVD drive. Remember those? You need to create an empty VHD file which represents a system with no OS installed. The VM will boot from the virtual DVD and walk you through the Windows Install wizard. This can all be done through the Hyper-V GUI or from PowerShell:

New-VM -Name "myVM" -MemoryStartupBytes 1GB -NewVHDPath "D:\VHDs\w81.vhdx" -NewVHDSizeBytes 60GB
Set-VMDvdDrive -VMName myVM -Path "C:\ISOs\EVAL_EN-US-IRM_CENA_X64FREE_EN-US_DV5.iso"
Start-VM "myVM"

Once I complete the Windows installation and rename the computer, I create a checkpoint so that I can always snap to the point in time when windows had absolutely no additional configuration beyond installation and computer rename.

Checkpoint-VM -Name "myVM" -SnapshotName "BareOS"

Create a new VM from an existing base OS VHD

After performing the above procedure from an ISO, I like to “freeze” the VHD of the newly installed OS. To do this, I create a differencing disk of that VHD and mark the original VHD as read only. Now I can create new VMs based on the differencing disk that contains only the difference of the fresh install and all subsequent work. Here, I’ll create a differencing VHD based on the VHD we created for our new VM above and then we will attach it to the new VM:

Stop-VM myVM
New-VHD -Path "D:\VHDs\w81diff.vhdx" -ParentPath "D:\VHDs\w81.vhdx" -Differencing
Set-VMHardDiskDrive -VMName myvm -Path "D:\VHDs\w81diff.vhdx"
Start-VM myVM


Downloading evaluation versions of Windows installers

You don't need a purchased copy of Windows or a fancy shmancy MSDN subscription to get a Windows OS for testing purposes. As of this posting, anyone can download evaluation copies of Windows 8.1, Server 2008 R2 and 2012 R2. The evaluation period is between 90 and 180 days depending on the version you download. In addition to the ISO, the server OS versions also provide an option to download VHD’s. These allow you to skip the OS installer. They come with a builtin Administrator account with a password set to Pass@word1. Convenient since that is the same password I use for all of my personal online accounts. When the evaluation expires, it is perfectly legal to simply start over from the original installer or VHD. Here are the current URLs you can use to download these evaluations:

Connecting the VM to the internet

While it is certainly possible and sometimes desirable to write Chocolatey packages that work fine offline, chances are that you want your VM to be able to access the world wide web. There are several ways to do this. For most “normal” dev environments, the following approach should work.

Get a listing of your Network Adapters:

C:\> Get-NetAdapter

Name                      InterfaceDescrip                        ifIndex Status                                                                          s
----                      --------------------                    ------- -----
Bluetooth Network Conn... Bluetooth Device (Personal Area Netw...       5 Di...
Wi-Fi                     Intel(R) Centrino(R) Advanced-N 6205          3 Up


Next add a “Virtual Switch” that binds to your actual network adapter. This only has to be done once on the VM host. The switch can be reused on all guests created on the host. After adding the switch, it can be applied to the VM:

New-VMSwitch -NetAdapterInterfaceName "Wi-Fi" -Name MySwitch
Set-VMSwitch -Name "myVM" -VMSwitch "MySwitch"

In my case, since I am using a wireless adapter, Hyper-V creates a network bridge and a new Hyper-V adapter that binds to the bridge and that any VM using this switch will use.

Getting Boxstarter

There are lots of ways to get the Boxstarter modules installed. If you have Chocolatey, just CINST Boxstarter. Otherwise, you can download the installer from either the codeplex site or Boxstarter.org and run the setup.bat in the zip file and then open a new PowerShell window. Since the Boxstarter.HyperV module requires at least PowerShell 3 which can auto load all modules in your PSModulePath and the Boxstarter installer adds the Boxstarter modules to that path, all Boxstarter commands should be available without needing to import any modules explicitly.

Tell Boxstarter where your packages are and build them

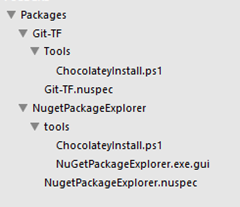
Perhaps the packages you want to test have not yet been pushed to a nuget feed and you want to test the local development version. Boxstarter provides several commands to make creating packages simple. See the boxstarter docs for details. We’ll assume that we have pulled our package repository from source control to a local Packages directory. It has two packages:
image

Now we will tell Boxstarter where our local packages are stored by changing Boxstarter’s localRepo setting from the default BuildPackages folder in Boxstarter’s module directory to our package directory.

C:\dev\Packages> Set-BoxstarterConfig –LocalRepo .
C:\dev\Packages> $Boxstarter

Name                           Value
----                           -----
IsRebooting                    False
NugetSources                   http://chocolatey.org/api/v2;http://www.myget...
BaseDir                        C:\Users\Matt\AppData\Roaming\Boxstarter
LocalRepo                      C:\dev\packages
RebootOk                       True
Log                            C:\Users\Matt\AppData\Local\Boxstarter\boxsta...
SuppressLogging                False


Checking the $Boxstarter variable that holds our boxstarter settings confirms that Boxstarter is tracking our local repository where we are currently working.

Now Boxstarter can build our packages by using the Invoke-BoxstarterBuild command:

C:\dev\Packages> Invoke-BoxStarterBuild -all
Boxstarter: Scanning C:\dev\packages for package folders
Boxstarter: Found directory Git-TF. Looking for Git-TF.nuspec
Calling 'C:\Chocolatey\chocolateyinstall\nuget.exe pack .\Git-TF\Git-TF.nuspec -NoPackageAnalysis'.
Attempting to build package from 'Git-TF.nuspec'.
Successfully created package 'C:\dev\packages\Git-TF.2.0.2.20130214.nupkg'.

Your package has been built. Using Boxstarter.bat Git-TF or Install-BoxstarterPackage Git-TF will run this package.
Boxstarter: Found directory NugetPackageExplorer. Looking for NugetPackageExplorer.nuspec
Calling 'C:\Chocolatey\chocolateyinstall\nuget.exe pack .\NugetPackageExplorer\NugetPackageExplorer.nuspec -NoPackageAnalysis'.
Attempting to build package from 'NugetPackageExplorer.nuspec'.
Successfully created package 'C:\dev\packages\NugetPackageExplorer.3.7.0.20131203.nupkg'.

Your package has been built. Using Boxstarter.bat NugetPackageExplorer or Install-BoxstarterPackage NugetPackageExplorer will run this package.

This iterates all folders in our local repo and creates the .nupkg files for all our package nuspec files. Note that if we do not want to build every package we could specify a single package to build:

C:\dev\Packages> Invoke-BoxStarterBuild -Name Git-TF

Testing the packages in your VMs

Now we are ready to test our packages. Unless the package is incredibly trivial, I like to test on at least a PowerShell 2 and a Powershell 3 (or 4) environment since there are some unobvious incompatibilities between v2 and post v2 versions. We will test against Server 2012 and Server 2008 R2. We can pipe our VM names to Boxstarter’s Enable-BoxstarterVM command which will inspect the VM and ensure that Boxstarter can connect to the VM using PowerShell remoting. If it can not, Boxstarter will manipulate the VM machine’s registry settings in its VHD to enable WMI Firewall rules which will allow Boxstarter to connect and enable PowerShell remoting. We will also ask Boxstarter to restore a checkpoint (named “fresh”) that we previously set which brings the VM to a clean state.

After ensuring that it can establish connections to the VMs, Boxstarter copies the Boxstarter modules and the local repository nupkg files to the VM. Then Boxstarter initiates the installation of the package on the VM.

So lets have Boxstarter test a package out on our VMs and analyze the console output.

C:\dev\Packages> "win2012","win2k8r2" | Enable-BoxstarterVM
-Credential $c -CheckpointName fresh | Install-BoxstarterPackage -PackageName NugetPackageExplorer -Force
Boxstarter: fresh restored on win2012 waiting to complete...
Boxstarter: Configuring local Powershell Remoting settings...
Boxstarter: Testing remoting access on win2012...
Boxstarter: Testing WSMAN...
Boxstarter: fresh restored on win2k8r2 waiting to complete...
Boxstarter: Configuring local Powershell Remoting settings...
Boxstarter: Testing remoting access on WIN-HNB91NNAB2G...
Boxstarter: Testing WSMAN...
Boxstarter: Testing WMI...

Here I pipe the names of my VMs to Boxstarter’s Enable-BoxstarterVM command. I have a checkpoint named “fresh” which is my “clean” state so Boxstarter will restore that checkpoint before proceeding. The result of Enable-BoxstarterVM, which is the computer name and credentials of my VMs, is piped to Install-BoxstarterPackage which will perform the package installation.

We can see that Boxstarter checks WSMan, the protocol used by PowerShell remoting, and if that is not enabled it also checks WMI. Windows 2012 has PowerShell remoting enabled by default so there is no need to check WMI, but Server 2008 R2, does not have PowerShell remoting enabled and thus checks for WMI. I am using the built-in administrator account and WMI is accessible. Therefore Boxstarter does not need to make any adjustments to the VM’s registry. If WMI was not accesible or if I was using a local user, Boxstarter would need to edit the registry and enable the WMI ports and also enable LocalAccountTokenFilterPolicy for the local user.

Also note that the 2008 R2 VM has a different computer name than the VM Name, WIN-HNB91NNAB2G. Boxstarter will find the DNS name of the VM and pass that on to the Install-BoxstarterPackage command which needs that to establish the remote connection.

Boxstarter Version 2.2.56
(c) 2013 Matt Wrock. http://boxstarter.org

Boxstarter: Configuring local Powershell Remoting settings...
Boxstarter: Configuring CredSSP settings...
Boxstarter: Testing remoting access on win2012...
Boxstarter: Remoting is accesible on win2012
Boxstarter: Copying Boxstarter Modules and local repo packages at C:\dev\Packages to C:\Users\Matt\AppData\Local\Temp on win2012...
Boxstarter: Creating a scheduled task to enable CredSSP Authentication on win2012...

Here Boxstarter begins the install on win2012. It determines that remoting to the VM is accessible, copies the Boxstarter modules and the local packages and enables CredSSP (using CredSSP allows Boxstarter packages to access other remote resources that may need the user’s credentials like network shares).

[WIN2012]Boxstarter: Installing package 'NugetPackageExplorer'
[WIN2012]Boxstarter: Disabling Automatic Updates from Windows Update
[WIN2012]Boxstarter: Chocolatey not instaled. Downloading and installing...
[WIN2012]+ Boxstarter starting Calling Chocolatey to install NugetPackageExplorer. This may take several minutes to complete...
Chocolatey (v0.9.8.23) is installing 'NugetPackageExplorer' and dependencies. By installing you accept the license for 'NugetPackageExplorer' and each dependency you are installing.
______ DotNet4.5 v4.5.20120822 ______
Microsoft .Net 4.5 Framework is already installed on your machine.
______ NugetPackageExplorer v3.7.0.20131203 ______
Downloading NugetPackageExplorer 64 bit (https://github.com/mwrock/Chocolatey-Packages/raw/master/NugetPackageExplorer/NpeLocalExecutable.zip) to C:\Users\ADMINI~1\AppData\Local\Temp\chocolatey\NugetPackageExplorer\NugetPackageExplorerInstall.zip
Extracting C:\Users\ADMINI~1\AppData\Local\Temp\chocolatey\NugetPackageExplorer\NugetPackageExplorerInstall.zip to C:\Chocolatey\lib\NugetPackageExplorer.3.7.0.20131203...
NugetPackageExplorer has finished successfully! The chocolatey gods have answered your request!
'C:\Chocolatey\lib\NugetPackageExplorer.3.7.0.20131203\NugetPackageExplorer.exe' has been linked as a shortcut on your desktop
File association not found for extension .nupkg
    + CategoryInfo          : NotSpecified: (File associatio...xtension .nupkg
   :String) [], RemoteException
    + FullyQualifiedErrorId : NativeCommandError
    + PSComputerName        : win2012

Elevating Permissions and running C:\Windows\System32\WindowsPowerShell\v1.0\powershell.exe -NoProfile -ExecutionPolicy unrestricted -Command "& import-module -name  'C:\Chocolatey\chocolateyinstall\helpers\chocolateyInstaller.psm1'; try{cmd /c assoc .nupkg=Nuget.Package; start-sleep 6;}catch{write-error 'That was not
sucessful';start-sleep 8;throw;}". This may take awhile, depending on the statements.
Elevating Permissions and running C:\Windows\System32\WindowsPowerShell\v1.0\powershell.exe -NoProfile -ExecutionPolicy unrestricted -Command "& import-module -name  'C:\Chocolatey\chocolateyinstall\helpers\chocolateyInstaller.psm1'; try{cmd /c ftype Nuget.Package="C:\Chocolatey\lib\NugetPackageExplorer.3.7.0.20131203\NugetPackageExplorer.exe" %1; start-sleep 6;}catch{write-error 'That was not sucessful';start-sleep 8;throw;}". This may take awhile, depending on the statements.
NuGet Package Explorer has finished successfully! The chocolatey gods have answered your request!
Adding C:\Chocolatey\bin\NuGetPackageExplorer.bat and pointing to '%DIR%..\lib\nugetpackageexplorer.3.7.0.20131203\nugetpackageexplorer.exe'.
Adding C:\Chocolatey\bin\NuGetPackageExplorer and pointing to '%DIR%..\lib\nugetpackageexplorer.3.7.0.20131203\nugetpackageexplorer.exe'.
Setting up NuGetPackageExplorer as a non-command line application.
Finished installing 'NugetPackageExplorer' and dependencies - if errors not shown in console, none detected. Check log for errors if unsure.
[WIN2012]+ Boxstarter finished Calling Chocolatey to install NugetPackageExplorer. This may take several minutes to complete... 00:00:31.8857706
[WIN2012]Boxstarter: Enabling Automatic Updates from Windows Update

Errors       : {File association not found for extension .nupkg}
ComputerName : win2012
Completed    : True
FinishTime   : 12/28/2013 1:05:13 AM
StartTime    : 12/28/2013 1:04:00 AM

Now we see mostly what we would expect to see if we were doing a vanilla CINST via Chocolatey. What is noteworthy here is that Boxstarter outputs an object to the pipeline for each VM. This object holds basic metadata regarding the installation including any errors encountered. In our case, the installation did produce one non-terminating error. Overall the install is successful.

Now Boxstarter moves on to the Server 2008 R2 VM.

Boxstarter: Testing remoting access on WIN-HNB91NNAB2G...
Boxstarter: Enabling Powershell Remoting on WIN-HNB91NNAB2G
Boxstarter: PowerShell Remoting enabled successfully
Boxstarter: Copying Boxstarter Modules and local repo packages at C:\dev\Packages to C:\Users\Matt\AppData\Local\Temp on WIN-HNB91NNAB2G...
Boxstarter: Creating a scheduled task to enable CredSSP Authentication on WIN-HNB91NNAB2G...

This is slightly different from the Server 2012 install. PowerShell remoting was not initially enabled on Windows 2008 R2; so Boxstarter needed to enable it before it could copy over the Boxstarter modules and local packages.

[WIN-HNB91NNAB2G]Boxstarter: Installing package 'NugetPackageExplorer'
[WIN-HNB91NNAB2G]Boxstarter: Disabling Automatic Updates from Windows Update
[WIN-HNB91NNAB2G]Boxstarter: Downloading .net 4.5...
[WIN-HNB91NNAB2G]Boxstarter: Installing .net 4.5...
[WIN-HNB91NNAB2G]Boxstarter: Chocolatey not instaled. Downloading and installing...

[WIN-HNB91NNAB2G]Boxstarter: Enabling Automatic Updates from Windows Update
[WIN-HNB91NNAB2G]Boxstarter: Restart Required. Restarting now...
Boxstarter: Waiting for WIN-HNB91NNAB2G to sever remote session...
Boxstarter: Waiting for WIN-HNB91NNAB2G to respond to remoting...

Next is more activity that we did not see on Server 2012. Server 2008 R2 comes with .Net 2.0 installed. Chocolatey needs at least 4.0 and Boxstarter will install v4.5 if v4.0 is not installed since v4.5 is an “in place upgrade” from 4.0 and thus includes 4.0. After installing .Net4.5 and Chocolatey, there is a pending reboot. Boxstarter needs to reboot the VM before proceeding with the install in order to reduce the risk of a failed install.

The remainder of the Server 2008 R2 install is identical to the Server 2012 install and so we will not examine the rest of the output.

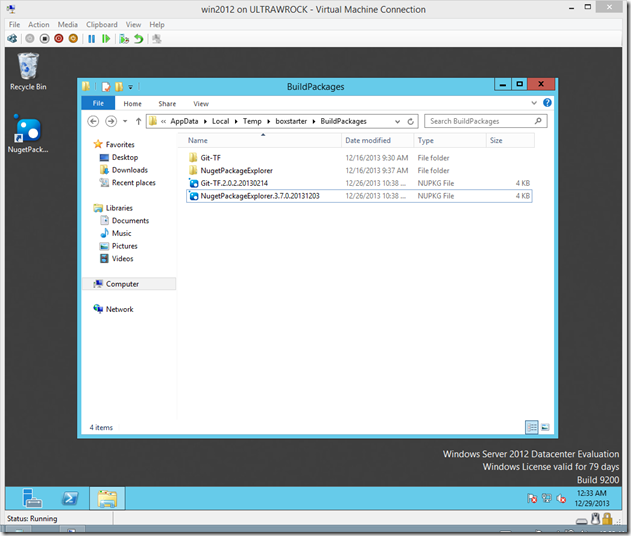
Now your VMs should have the NugetPacketExplorer installed and all *.Nupkg files should be associated with that application.
image


Creating Checkpoints

In the Enable-BoxstarterVM call we saw above, we restored to a known clean state that we had previously saved. However, we can also have Boxstarter create the clean state. In the example we used above, we hade a checkpoint named “fresh” that Boxstarter restored. If that checkpoint did not exist, Boxstarter would have created one just after exiting Enable-BoxstarterVM.

Rolling package testing into Continuous Integration

This post shows you how you can use Boxstarter and Hyper-V to create an environment where you can easily test package development. However, wouldn’t it be great to take this to the next level and have your package checkins automatically kickoff a package install on a Azure or AWS VM? My next post will explore just that which will be possible when I release the Windows Azure integration.

Released Boxstarter 2.1: Install multiple Windows environments in one command and better pipeline output by Matt Wrock

multiboxToday I released Boxstarter v2.1.0 which includes support for piping multiple machines to the Install-BoxstarterPackage command and much improved options for receiving output on both the standard output pipeline as well as the host console. This release also adds a few bug fixes and some “Fit and Finish” details for remote installs.

These features were originally intended for v2.0, but the core 2.0 remoting integration proved to be much more involved than anticipated and stood well on their own. So in the interest of getting that release out the door sooner, I held off on these rather minor additions. I think this release does provide a better experience but it is the final prerequisite for the VM integration release coming next.

Multiple Machine Installs

While this is possible in v2.0 by simply looping over a list of computer names, connection URIs or PowerShell sessions, the first class support for installing packages on multiple machines does provide some improved efficiencies and an easier way of processing the results. Boxstarter can configure the local Windows PowerShell remoting settings for all machines at once instead of setting and rolling back on each machine.

The ComputerName, ConnectionURI and Session parameters of Install-BoxstarterPackage can now be passed in an array and can also be passed in the pipeline input.

$cred=Get-Credential=MyTargetMachine\myusername
Get-WebServerNames | 
  Install-BoxstarterPackage -PackagNamee WebPackage -Credential $cred –Force


Assuming Get-WebServerNames returns an array of server names, the above command will install the WebPackage package on each. Boxstarter will ensure that all of those servers are in the local machine’s list of trusted hosts and ensures that credentials can be delegated to them as well before establishing the remote session.

Receive installation results as separate objects on the pipeline

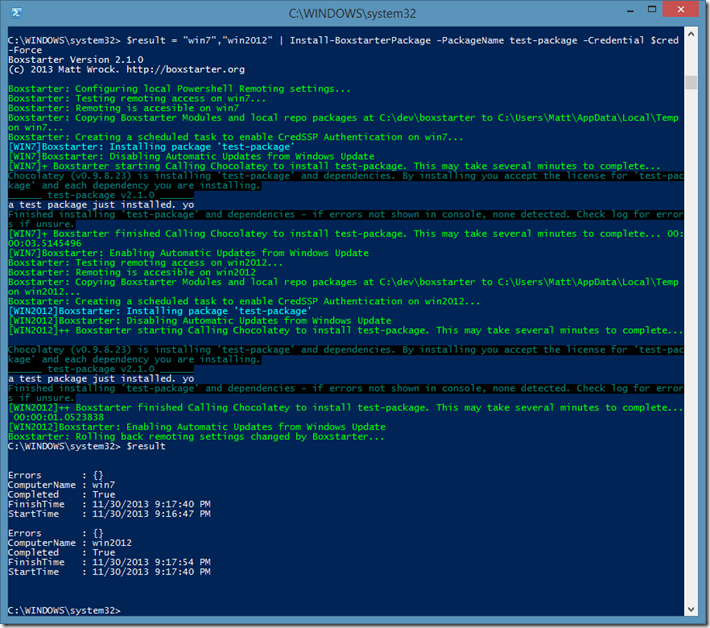
For each machine that Boxstarter runs the package, a PSObject is returned with metadata related to the results of the install.

result2

The properties included in the PSObject are:

  • ComputerName: The name of the computer where the package was installed
  • StartTime: The time that the installation began
  • FinishTime: The time that Boxstarter finished the installation
  • Completed: True or False indicating if Boxstarter was able to complete the installation without a terminating exception interrupting the install. Even if this value is True, it does not mean that all components installed in the package succeeded. Boxstarter will not terminate an installation if individual Chocolatey packages fail. Use the Errors property to discover errors that were raised throughout the installation.
  • Errors: An array of all errors encountered during the duration of the installation.

There are probably other properties that will be added to this object in future releases. Maybe a list of all chocolatey packages successfully installed.

Adjusting host output verbosity

A lot of the output that Boxstarter would previously output to the console is now sent to the verbose stream. In other words, by default, Boxstarter tries to limit output to things that are either of immediate interest or indicate that something that might take a while is taking place. Everything else is still available, but requires the use of the –Verbose parameter to be output to the console. However, all verbose content is always written to the Boxstarter.log file in case you want to refer to this information later.

If you would like to silence everything except the standard output stream (all verbose and write-host output), you can set $Boxstarter.SuppressLogging to $True.

> $Boxstarter.SuppressLogging=$True
> "win7","win2012" | Install-BoxstarterPackage -PackageName test-package -Credential $cred -Force

Errors       : {}
ComputerName : win7
Completed    : True
FinishTime   : 11/30/2013 9:41:58 PM
StartTime    : 11/30/2013 9:41:54 PM

Errors       : {}
ComputerName : win2012
Completed    : True
FinishTime   : 11/30/2013 9:42:11 PM
StartTime    : 11/30/2013 9:41:58 PM

Other fixes and improvements

In addition to these features added, there are a few additional items worthy of notice:

  • Don't touch UAC or AutoLogon registry keys on remote installs.
  • Improve Remote Reboot detection and suppressing reapeted connection creations while remote machine is installing windows updates.
  • Fix overriding organization update servers with the public Windows Update server.
  • Fix remoting configuration when client has assigned Trusted Hosts to a global wildcard.
  • Improve reliability of .net 4.5 installation as Chocolatey prerequisite particularly when running on a newly installed OS.

Up Next: Boxstarter Virtualization Module

Other than possible bug fix releases, I don’t plan on any releases between now and the first version of a new Boxstarter PowerShell module that focuses on VM provisioning. This module should provide support for Hyper-V, AWS, and Azure VMs. Given a VM name, Boxstarter will enable PowerShell remoting on the VM with no user intervention. It will eliminate the need to check and manually configure remoting on target machines. It will return a ConnectionURI that Install-BoxstarterPackage can use to install packages. At least for Hyper-V, this will include the ability to reset the VM to a specified checkpoint as well.

So stay tuned…