Released Boxstarter 2.0: Remote Windows Environment Installs, Packageless Scripts and a New Documentation Web Site! by Matt Wrock

amazon

A couple weeks ago, I released Boxstarter 2.0 with lots of new features, a couple of which I think are especially cool. Now that the documentation and new web site at Boxstarter.org are complete, I think a proper blog post is in order.

While I did bump the major version, this release is compatible with any 1.x.x Boxstarter script. The version number increase is intended to emphasize some significant features introduced in this release.

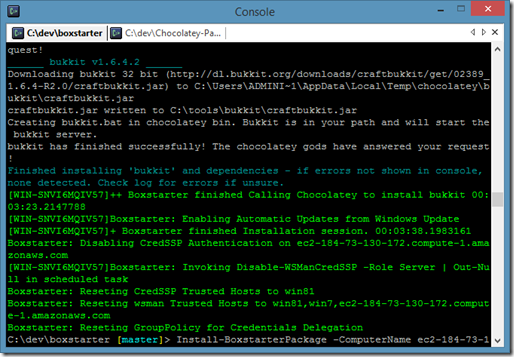
Above is a screenshot of installing a Minecraft server onto an AWS Machine on my local laptop powershell console.

Remote Installations

Perhaps the most significant feature introduced in this release is remote installations - the ability to point Boxstarter to any remote machine and supply a package that can be installed on that machine from the user’s local command line. This could be your other laptop or a Hyper-V, Azure or AWS VM.

This does require powershell remoting to be enabled on the remote machine. That’s uper simple to do. Just run this command as administrator on the remote machine.

Enable-PSRemoting –Force

You only have to do this once. However, if WMI ports are open on that machine, Boxstarter can enable remoting remotely. Remoting on the local machine where Boxstarter runs is completely configured, if necessary, by Boxstarter. You can install Boxstarter Packages (which are Chocolatey packages really) on any remote machine that meets Boxstarter’s prerequisites (at least Powershell 2 on Windows 7/2008R2 or higher) just like you would locally with this command:

$cred=Get-Credential=MyTargetMachine\myusername
Install-BoxstarterPackage -ComputerName MyTargetMachine -PackageName MyPackage -Credential $cred

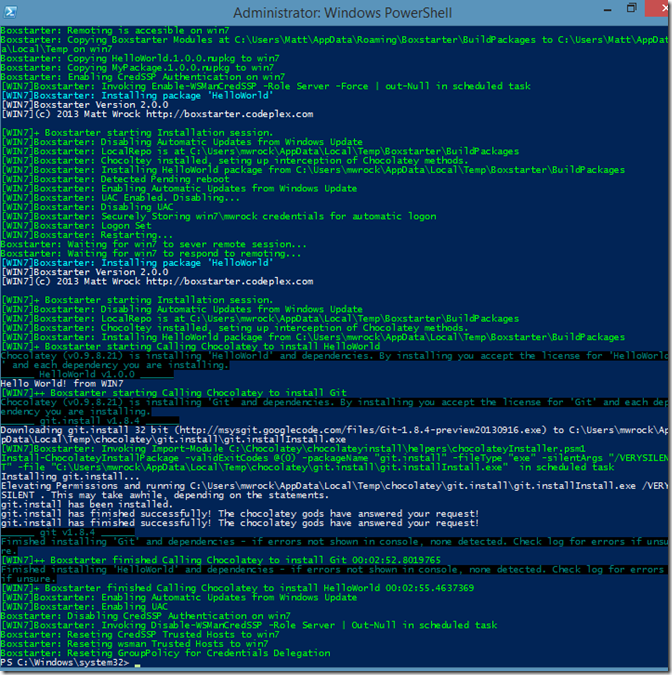
Here is a screenshot of a remote install to a Windows 7 VM: result

Laying the groundwork for VM provisioning

Back in September I began work to automate VM provisioning using Boxstarter. This really ended up being more about learning than simply building features. Long story short: I ended up figuring out exactly how to do this but in the process realized it would be best to “decouple” the remote installation from the VM mechanics. So expect the VM stuff fairly soon where you may see a command like this:

Get-BoxstarterVM -VMName MyVM -SnapShotName myCheckpoint | `
Install-BoxstarterPackage -PackageName MyPackage -Credential $creds

Get-BoxstarterVM will enable remoting, restore the optional chekpoint and return a ConnectionURI to be piped to Install-BoxstarterPackage. There will be a different flavor for Hyper-V, Azure and AWS.

No Package needed, Install environments with a Gist!

Now you can use a text file or any URL that contains raw text (like a gist) in lieu of a Package name. If Boxstarter detects that a package name is resolvable to a local file or it begins with http(s)://, Boxstarter will auto generate a temporary package injecting this text as the ChocolateyInstall.ps1. For example:

gist3

Install-BoxstarterPackage -PackageName `
https://gist.github.com/mwrock/7382880/raw/f6525387b4b524b8eccef6ed4d5ec219c82c0ac7/gistfile1.txt

I’d like to credit and thank Eric Williams (@MotoWilliams) for coming up with this great idea. In many cases particularly with a Boxstarter install, there may not be a need to have a Nuget package published on a feed. It might be a one-off install or something intended for just yourself and maybe a few others. So having to pack and push a Chocolatey package is likely overkill.

This also works with the Boxstarter Web Launcher URLs.

http://boxstarter.org/package/nr/url?https://gist.github.com/mwrock/7382880/raw/f6525387b4b524b8eccef6ed4d5ec219c82c0ac7/gistfile1.txt

This doesn’t even require Boxstarter or Chocolatey to be installed. Run this from IE and a .net click-once app is downloaded and installed that will bootstrap a Boxstarter install of the gist script.

Other new Features:

  • Reboots now suspend Bitlocker if enabled, preventing the need to enter your bitlocker key before startig windows
  • Its compatible with the newly released Chocolatey version 0.9.8.23
  • If installing on a machine that does not require a password, Boxstarter will no longer prompt for one if you do not provide Credentials to Install-BoxstarterPackage or if you use the –NoPassword parameter of Invoke-ChocolateyBoxstarter or Boxstarter.bat.

Brand new Boxstarter.org with lots of Documentation and “How To”s

I want Boxstarter to be easy to use and help to be discoverable. So I spent my free time over a weekend composing a bunch of help pages capturing all of the key Boxstarter scenarios. This includes instructions for:

  • Installing Boxstarter
  • Creating Packages
  • Publishing Packages
  • Executing packages

I think I covered most of the permutations of these activities clearly. Please let me know if you find anything that is not clear or if there are gaps not covered.

Hope to be getting back to feature work soon and release the new Boxstarter Virtualization module.

Copy Files From Local Computer to an Azure VM by Matt Wrock

vmI’m currently ironing out my strategy of how my Boxstarter Virtualization module will provision VM’s in Azure. I recently started a blog series of how I will provision local Hyper-V VMs here. My strategy for Azure VMs will be similar in that I will do most of the heavy lifting via Powershell remoting and fortunately lighting up a Azure VM with powershell remoting all set to go is a lot simpler that with a normal Hyper-V VM. The trick is getting the initial boxstarter modules copied to the VM. Based on some cursory googling, there are a lot of people trying to copy files to their azure VM and the most common approach is to copy/paste them via remote desktop. That does not work for me. It has to be 100% hands off.

So here is the script to accomplish this:

#Create and mount a new local VHD$volume = new-vhd -Path test.vhd -SizeBytes 50MB | `  Mount-VHD -PassThru | `  Initialize-Disk -PartitionStyle mbr -Confirm:$false -PassThru | `  New-Partition -UseMaximumSize -AssignDriveLetter -MbrType IFS | `  Format-Volume -NewFileSystemLabel "VHD" -Confirm:$false

#Copy my files  Copy-Item C:\dev\boxstarter "$($volume.DriveLetter):\" -RecurseDismount-VHD test.vhd

#upload the Vhd to azureAdd-AzureVhd -Destination http://mystorageacct.blob.core.windows.net/vhdstore/test.vhd `  -LocalFilePath test.vhd

#mount the VHD to my VMGet-AzureVM MyCloudService MyVMName | `  Add-AzureDataDisk -ImportFrom `  -MediaLocation "http://mystorageacct.blob.core.windows.net/vhdstore/test.vhd" `  -DiskLabel "boxstarter" -LUN 0 | `  Update-AzureVM

This uses the Powershell v3 Hyper-V module to create the VHD locally. Then it uses the Azure Powershell module (available for download here) to upload that vhd and mount it to my VM.

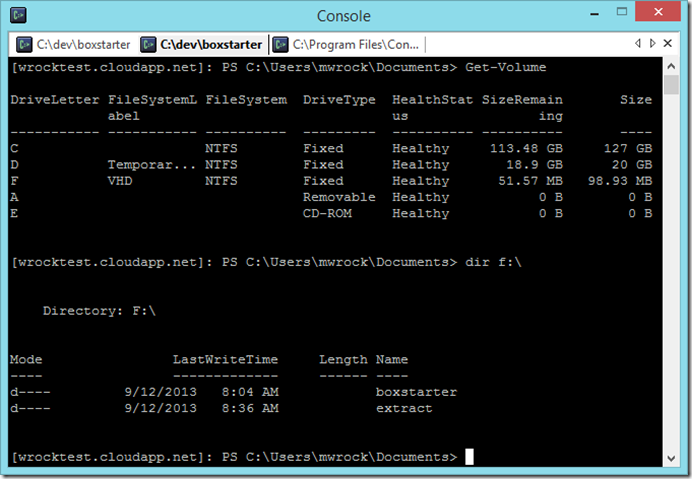
Here is a screenshot of my remote Powershell session connected to my azure VM.

azurecopy

Maybe there is a better way. I’d love to hear it if you know of one, but this works well without having to expose a public SMB endpoint.

With this in place I can invoke Boxstarter on the VM and initiate a provisioning session that installs and configures all of my things. My virtualization module will allow individuals to provision a VM with a command like this:

New-BoxstarterAzureVM VMName -BoxstarterPackage mypackage `  -InstanceSize "ExtraSmall" -OS "Windows-Server-2012-Datacenter" `  -credential Admin -location  "West US"

Windows VM Provisioning Part 1: Inject a ‘startup on boot ‘ script into a VHD. by Matt Wrock

jokescript

I’m currently in the process of adding a Virtualization module to my Boxstarter project. This post is part of a three part series covering some of the technicalities involved. Although these posts will document how Boxstarter provisions a Windows VM, I think that there will be information covered to accommodate a wide range of scenarios whether you are interested in using Boxstarter or not.

The Boxstarter Scenario

Boxstarter is a set of Powershell modules (or you can simply invoke from a URL) that can deploy a single application or standup a complete environment from a script leveraging Chocolatey and Nuget packaging technologies. Its target scenario is to bring a Windows machine from bare OS to an environment that is fully patched and has everything you need to get stuff done. Yes, there are lots of cool solutions that can do this at enterprise scale but Boxstarter is designed to be light weight and very simple. It can perform this provisioning on a physical machine but what about VMs?

You can of course log on to a VM and use Boxstarter just as you would on any physical machine, but I want to eliminate the need to have to setup network settings and manually RDP or use a Hyper-V console to connect to the VM. Deploying a Boxstarter Install to a VM should be just as simple as any other environment.

How will Boxstarter provision a VM without the need to manually prepare it

Here is the basic flow:

  1. Inject a script into a VHD that will run under the local machine account with administrative privileges on boot. This script will add a firewall rule and edit the Local Account Token Filter Policy.
  2. Use PSEXEC to invoke another script from a user account that will enable powershell Remoting on the VM with credssp authentication so that your credentials in the remote session can be used to access other remote resources from the VM.
  3. Use powershell remoting to Invoke a Boxstarter package from the VM Host but that will run on the VM Guest.
  4. Wrap all of this up into a single, simple command. that can be extended to be VM Vendor agnostic but will work with Hyper-V and Windows Azure VMs out of the box.

Ideally, this could even be leveraged to create a Vagrant Provisioner.

This post will cover the zeroth point above. The use cases of plugging a startup script right into a VHD span well beyond Boxstarter and the means of doing it is not particularly difficult but it did take me a while to figure out how to get it done right to accommodate both simple workstation environments as well as Domain topologies.

Requirements on the Host and Guest

The Goal is that this should work on any “vanilla” bare OS guest install with access to the internet and no “special” networking configuration. No Firewall tweaking, no need to enable powershell remoting on the host or guest and no installation of software on the guest beyond the operating system. That said, the following are required:

  1. The VM guest must be able to access the internet unless your boxstarter package installs everything from a local source.
  2. The Host must be running at least Powershell v.3 and have the Hyper-V module available.
  3. The Guest must be running windows 7, 8, server 2008 R2 or server 2012.
  4. The VHD where the script is injected must contain the system volume of the VM (windows\system32).

The Script Script (the script that installs the script)

The script lives in the Boxstarter.VirtualMachine module and can be called like so:

$vhd=Get-VMHardDiskDrive -VMName "MyVMName"Add-VHDStartupScript $vhd.Path -FilesToCopy "c:\myFiles\file.ps1","..\MyOtherFiles" {    $here = Split-Path -Parent $MyInvocation.MyCommand.Path    . "$here\file.ps1"}
This will take the VHD used by the VM on the host named MyVMName, the file c:\myfiles\file.ps1 as well as all files in ..\MyOtherFiles will be copied to the VHD. Furthermore, the script block above will be stored in a file in the same directory as the copied files. A local Group Policy will be added to the Registry stored in the VHD that will call the above script when the VM next boots. To be clear, the script runs at boot time and not login time so that no separate login is necessary to kick things off. The script will run under the local machine account.

Validate and Mount the VHD

function Add-VHDStartupScript {[CmdletBinding()]param(    [Parameter(Position=0,Mandatory=$true)]    [ValidateScript({Test-Path $_})]    [ValidatePattern("\.(a)?vhd(x)?$")]    [string]$VHDPath,    [Parameter(Position=1,Mandatory=$true)]    [ScriptBlock]$Script,    [Parameter(Position=2,Mandatory=$false)]    [ValidateScript({ $_ | % {Test-Path $_} })]    [string[]]$FilesToCopy = @())if((Get-ItemProperty $VHDPath -Name IsReadOnly).IsReadOnly){    throw New-Object -TypeName InvalidOperationException `      -ArgumentList "The VHD is Read-Only"}    $volume=mount-vhd $VHDPath -Passthru | get-disk | Get-Partition | Get-Volumetry{    Get-PSDrive | Out-Null    $winVolume = $volume | ? {        Test-Path "$($_.DriveLetter):\windows\System32\config"    }    if($winVolume -eq $null){        throw New-Object -TypeName InvalidOperationException `          -ArgumentList "The VHD does not contain system volume"    }
In the beginning of the script we validate the user input and Mount the VHD. Pretty straight forward stuff.

Copy files and create startup script file

$TargetScriptDirectory = "Boxstarter.Startup"mkdir "$($winVolume.DriveLetter):\$targetScriptDirectory" -Force | out-nullNew-Item "$($winVolume.DriveLetter):\$targetScriptDirectory\startup.bat" -Type File `  -Value "@echo off`r`npowershell -ExecutionPolicy Bypass -NoProfile -File `"%~dp0startup.ps1`""`  -force | out-nullNew-Item "$($winVolume.DriveLetter):\$targetScriptDirectory\startup.ps1" -Type File `  -Value $script.ToString() -force | out-nullForEach($file in $FilesToCopy){    Copy-Item $file "$($winVolume.DriveLetter):\$targetScriptDirectory" -Force}

Here we copy the files provided in the FilesToCopy parameter and create a powershell file to hold the script in the script block and a batch file that will invoke the powershell file.

Load the registry hive in the VHD

reg load HKLM\VHDSYS "$($winVolume.DriveLetter):\windows\system32\config\software" | out-null

This takes the file in the VHD that contains HKLM\Software, which is where the computer startup group policies reside and Loads its keys into a new hive referencable from HKLM:\VHDSYS. Now we can query and modify the values in the registry as easily as we can any of our local registry information.

Add the Group Policy

Now that the VHD Registry is loaded, we need to add a Local Group Policy that will invoke our startup.bat file upon boot. This is a bit involved to account for various scenarios such as:

  • What if you already have different startup scripts
  • What if you have already have added a startup script and do not want to add a duplicate
  • What if you have one or more domain group policies

To try and keep things at least somewhat tidy, we will place this logic in a separate function:

function Get-RegFile {    $regFileTemplate = "$($boxstarter.BaseDir)\boxstarter.VirtualMachine\startupScript.reg"    $startupRegFile = "$env:Temp\startupScript.reg"    $policyKey = "HKLM:\VHDSYS\Microsoft\Windows\CurrentVersion\Group Policy"    $scriptNum=0    $localGPONum=0    if(Test-Path "$policyKey\Scripts\Startup\0\0"){        $localGPO = Get-ChildItem "$policyKey\Scripts\Startup" | ? {            (GCI -path $_.PSPath -Name DisplayName).DisplayName -eq "Local Group Policy"        }        if($localGPO -ne $null) {            $localGPONum = $localGPO.PSChildName            $localGPO=$null #free the key for GC so it can be unloaded        }        else{            Shift-OtherGPOs "$policyKey\Scripts\Startup"            Shift-OtherGPOs "$policyKey\State\Machine\Scripts\Startup"        }        if(test-path "$policyKey\Scripts\Startup\$localGPONum"){            $scriptDirs = Get-ChildItem "$policyKey\Scripts\Startup\$localGPONum"            $existingScriptDir = $scriptDirs | ? {                 (Get-ItemProperty -path $_.PSPath -Name Script).Script `                  -like "*\Boxstarter.Startup\startup.bat"            }            if($existingScriptDir -eq $null){                [int]$scriptNum = $scriptDirs[-1].PSChildName                $scriptNum += 1            }            else {                $scriptNum = $existingScriptDir.PSChildName                $existingScriptDir = $null #free the key for GC so it can be unloaded            }        }        $scriptDirs=$null    }    (Get-Content $regFileTemplate) | % {        $_ -Replace "\\0\\0", "\$localGPONum\$scriptNum"    } | Set-Content $startupRegFile -force    return $startupRegFile}

function Shift-OtherGPOs($parentPath){    Get-ChildItem $parentPath | Sort-Object -Descending | % {        [int]$num = $_.PSChildName        $oldName = $_.Name.Replace("HKEY_LOCAL_MACHINE","HKLM:")        [string]$newName = "$($num+1)"        try {Rename-Item -Path $oldName -NewName $newName} catch [System.InvalidCastException] {            #possible powershell bug when renaming reg keys that are numeric            #the key is copied but the old key remains            Remove-Item $oldName -Recurse -force        }    }}
A couple things to note here. The script Group Policies appear to be mirrored at both:
  • HKLM:\VHDSYS\Microsoft\Windows\CurrentVersion\Group Policy\State\Machine\Scripts\Startup
  • HKLM:\VHDSYS\Microsoft\Windows\CurrentVersion\Group Policy\Scripts\Startup
    I honestly do not know why or what the significance is of the different locations. These are just the keys I saw that were affected when I manually played with creating startup scripts inside GPEDIT.MSC.

The Script keys maintain the following subkey structure:

\Scripts\Startup\{policy node}\{script node}

The policy and script nodes are each simple integers starting at 0 and increment for each additional policy scope or script. So a machine with a Local policy containing 1 script and a domain policy containing 2 scripts would look like:

\Scripts\Startup\0\0 – Local policy script

\Scripts\Startup\1\0 – First domain Policy script

\Scripts\Startup\1\1 – Second domain Policy script

From what I could tell in my experimentation, the Local Policy always occupied position 0.

Here are some surprising and unintuitive findings to be aware of:

  • When you are done with the registry you will need to unload it just as we loaded it in order to free up the file. That is not surprising. What is surprising is that if you save any keys to a variable as you are navigating its values, you will need to dereference those variables. It was fun in VB6 and it is still fun today! To add icing to this cake, you also need to do the thing that you should really never do: call GC::Collect() before unloading. Yep, that’s right. Unless of coarse you like Access Exceptions.
  • There seems to be a bug in the powershell registry provider when renaming keys that have a numeric value. Doing so raises a invalid cast exception. It also goes ahead and creates the renamed key but it does not delete the old name. This is why I delete it inside of the catch block.

The call to the above Get-RegFile function and the surrounding import code looks like:

reg load HKLM\VHDSYS "$($winVolume.DriveLetter):\windows\system32\config\software" | out-null$startupRegFile = Get-RegFilereg import $startupRegFile 2>&1 | out-nullRemove-Item $startupRegFile -force
We use the reg command to import the temp file with the altered template and then dispose of the temp file.
 

The registry import template

I found it easiest to create a .reg file containing all of the registry modifications instead of using the powershell registry provider to individually modify the tree. I simply needed to determine the correct policy and script nodes and then inject those into the template. Here is the template:

Windows Registry Editor Version 5.00

[HKEY_LOCAL_MACHINE\VHDSYS\Microsoft\Windows\CurrentVersion\Group Policy\State\Machine\Scripts]

[HKEY_LOCAL_MACHINE\VHDSYS\Microsoft\Windows\CurrentVersion\Group Policy\State\Machine\Scripts\Shutdown]

[HKEY_LOCAL_MACHINE\VHDSYS\Microsoft\Windows\CurrentVersion\Group Policy\State\Machine\Scripts\Startup]

[HKEY_LOCAL_MACHINE\VHDSYS\Microsoft\Windows\CurrentVersion\Group Policy\State\Machine\Scripts\Startup\0]"GPO-ID"="LocalGPO""SOM-ID"="Local""FileSysPath"="%SystemRoot%\\System32\\GroupPolicy\\Machine""DisplayName"="Local Group Policy""GPOName"="Local Group Policy""PSScriptOrder"=dword:00000001

[HKEY_LOCAL_MACHINE\VHDSYS\Microsoft\Windows\CurrentVersion\Group Policy\State\Machine\Scripts\Startup\0\0]"Script"="%SystemDrive%\\Boxstarter.Startup\\startup.bat""Parameters"="""ExecTime"=hex(b):00,00,00,00,00,00,00,00,00,00,00,00,00,00,00,00

[HKEY_LOCAL_MACHINE\VHDSYS\Microsoft\Windows\CurrentVersion\Group Policy\Scripts]

[HKEY_LOCAL_MACHINE\VHDSYS\Microsoft\Windows\CurrentVersion\Group Policy\Scripts\Shutdown]

[HKEY_LOCAL_MACHINE\VHDSYS\Microsoft\Windows\CurrentVersion\Group Policy\Scripts\Startup]

[HKEY_LOCAL_MACHINE\VHDSYS\Microsoft\Windows\CurrentVersion\Group Policy\Scripts\Startup\0]"GPO-ID"="LocalGPO""SOM-ID"="Local""FileSysPath"="%SystemRoot%\\System32\\GroupPolicy\\Machine""DisplayName"="Local Group Policy""GPOName"="Local Group Policy""PSScriptOrder"=dword:00000001

[HKEY_LOCAL_MACHINE\VHDSYS\Microsoft\Windows\CurrentVersion\Group Policy\Scripts\Startup\0\0]"Script"="%SystemDrive%\\Boxstarter.Startup\\startup.bat""Parameters"="""IsPowershell"=dword:00000000"ExecTime"=hex(b):00,00,00,00,00,00,00,00,00,00,00,00,00,00,00,00

Cleaning up

Finally, we unload the registry hive and dismount the VHD:

}finally{    [GC]::Collect()    reg unload HKLM\VHDSYS 2>&1 | out-null    Dismount-VHD $VHDPath}

Again as noted before, we have the unattractive GC Collect. If anyone discovers a way to avoid this please comment but I was not able to find any other way around this. Failing to call Collect results in an Access Exception when unloading the registry. This is only the case if you have used the powershell registry provider to navigate the loaded hive. Also as noted before, if you have referenced any keys in a variable, you must deallocate those variables before the call to GC::Collect().

Reboot a VM attached to the VHD and see the script run

That’s it. Now you can reboot a VM attached to this VHD and its script will execute under the local machine account’s credentials with administrative privileges. Since the VHD format is supported by almost all of the major Virtualization vendors, you should be able to leverage this script on most virtualization platforms.

Next: Enable Powershell Remoting

The next post will explore how to use this script to enable powershell remoting on a VM guest. It is not enough to simply have the script enable remoting since remoting must be enabled by a user account. I’ll show you the approach I found that works to set that up.
Understanding networking options with a wireless Hyper-V host and solving Catastrophic failure (0x8000FFFF) by Matt Wrock

I have been experimenting lately with different network configurations and exploring ways to automate the setup and deployment of VMs in conjunction with Boxstarter. Along the way I have bumped up against some problems and discovered more than one way that many on the net recommend configuring a Windows 8 Hyper-V setup on a wireless network. In the process of this experimentation I have also managed to, more than once, screw things up. I’ll start with the screwing things up part.

Problem: cant create a Hyper-V network due to catastrophic failures

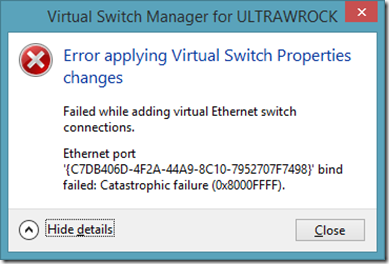
A few months ago my laptop ended up in a state where I could not create an external network on my Hyper-V virtual switch. All attempts resulted in a catastrophic failure which included the guid of the Network Interface and the hex code 0x8000FFFF.

Ethernet port '{C7DB406D-4F2A-44A9-8C10-7952707F7498}' bind failed: Catastrophic failure (0x8000FFFF).

catastrophy

After hours of futile random attempts to fix this and little to no clues from google, I arrived at a hypothesis that this was somehow connected to my VirtualBox setup that I had since uninstalled but there were some Network interfaces left over that I could not seem to remove. I ended up repaving my OS to get back to a good state.That was clearly not the solution I was hoping for.

SIDEBAR: I have been working on a project called Boxstarter off and on for the past year. This allows one to rebuild a machine in a scripted manner. It leverages the functionality of Chocolatey and adds an environment that is reboot resilient and also exposes some handy Cmdlets that tweak windows configuration and install updates. So this was not such a big deal since I can have my familiar dev environment back in about an hour.

Last weekend I started running into the exact same scenario and error. However, I have been doing some experimenting with different network and Hyper-V configurations lately and found a clue that helped me to recover without reinstalling my OS.

The Solution

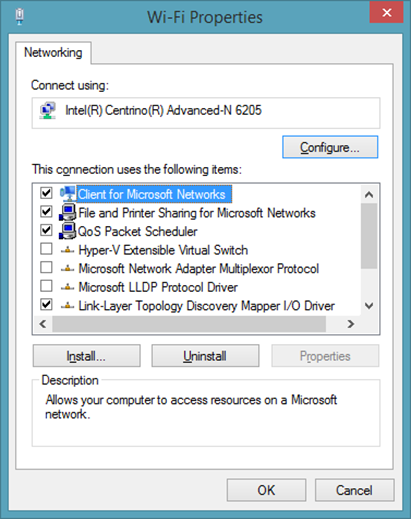
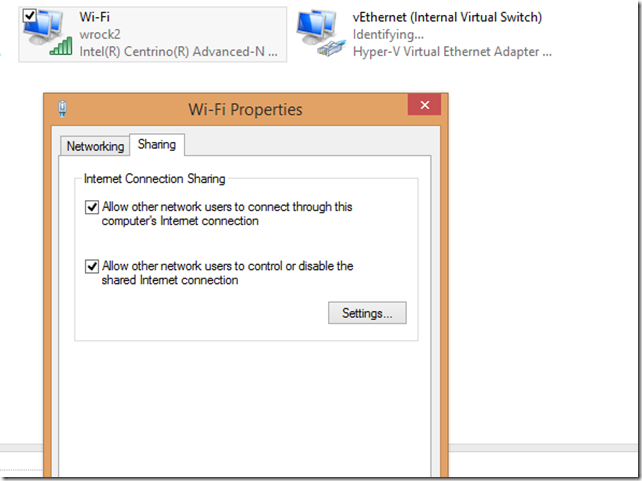
For those that do not care to read on, this was the issue: I had previously setup an “Internal Network” in Hyper-V and “Shared” my wireless adapters internet connection with my Hyper-V Internal Network. I later removed the Internal Network but did not turn off sharing on my wireless adapter first. A Shared network interface cannot be bridged, which is what is used when you create an External network on a wireless connection. Oddly even attempting to create a new Private hyper-v network was failing but with a different but equally unhelpful error. The key problem here is now that I only had one network adapter, the ability to turn on or off sharing was no longer available. The adapter was shared:

shared

but I could not go to the properties page, go to the “Sharing”  tab and then turn off sharing. The Sharing tab was no longer present.

NoTab


This problem is further complicated by the fact that even on Powershell 3 and 4 with all of its new Networking cmdlets, there is no cmdlet that can turn on or off Internet Connection Sharing. However, there are a set of COM interfaces that expose the sharing properties of a network interface. This script disabled  my internet sharing and allowed me to then create a new Hyper-V network:

function Disable-ICS{    $cfg = New-Object -ComObject HNetCfg.HNetShare.1    $all = $cfg.EnumEveryConnection    foreach($conn in $all){        $shareCfg=$cfg.INetSharingConfigurationForINetConnection($conn)        $props=$cfg.NetConnectionProps($conn)        $props        $shareCfg.DisableSharing()    }}

Disable-ICS

Hyper-V, Wireless Adapters, and a connected VM

One of the great things about Windows 8 is that one can run a Hyper-V server and host guest VMs. Given that I use my personal laptop to develop Boxstarter. Being able to test machine installs makes running VMs a necessity and I much prefer running the lighter weight Windows 8 over Server 2012. Also given that I am working on a laptop, I am always using a wireless connection.

The challenge of a wireless adapter

Prior to the Windows 8 implementation of Hyper-V, a Hyper-V VM could only connect to an external network through a wired network adapter. Since Hyper-V supports a Layer-2 switch, it routes traffic based on the MAC address of the virtual network adapters. A wired adapter can run in promiscuous mode and allow packets to be transmitted with the MAC address of the virtual NIC. A wireless adapter can only send traffic with its own MAC address. To mitigate this issue, the Windows 8 Hyper-V uses a bridged adapter to bridge the wireless NIC and the virtual NIC. Although the virtual MAC address is replaced by the wireless adapter’s MAC address when a packet is sent, the bridge maintains a mapping of virtual IP addresses to their MAC addresses so that traffic can be properly routed back to the correct VM.

Two ways to connect your Windows 8 VMs to the internet

#1: Using an External Network Switch

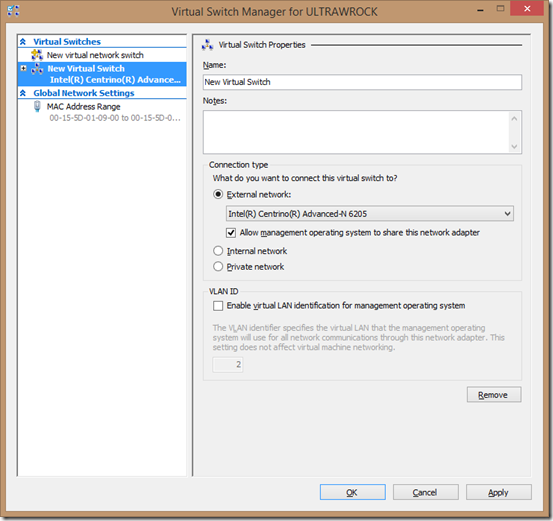
This is essentially exactly what I have just outlined above. In the Hyper-V manager (this can also be accomplished using the Hyper-V powershell module), go to the Virtual Switch Manager and create an External network binding to your wireless network adapter:

External


As previously described, this will create a new network adapter (the virtual adapter) and a network bridge that connects the virtual and wireless adapters.

BridgedFinally go to the “Add Hardware” section of your VM while it is turned off and add a Network Adapter assigning it to the switch you just created. Now your VMs access the same external network as the host as if they are simply another device attached to your wireless router and assigned their own IP from your router’s DHCP server.

#2: A Shared Internal Network

There is another option to connect your VMs to the internet besides using an External Virtual switch as described above. This includes the creation of an Internal virtual switch instead of an external one. An Internal switch establishes a connection between the guest VM and the host but not to the outside world. Ok. So how in the heck will that connect a VM to my internet? Well after you create the Internal switch:

internalYou will “Share” your wireless adapter with the internal switch.

share


Note that when you have one or more internal network adapters, the “sharing” tab becomes available in your WIFI adapter’s properties. If you had more than one internal adapter, you would also see a drop down menu allowing you to choose which internal adapter to share. Once you add the internal adapter to your VM, you should be able to access your host internet connection from your guest. Maybe…

Which method should I u…Maybe?…What does that mean?

If you have done much if any investigation already on setting up a windows 8 VM client on a wireless network, you have likely run across accounts of others having issues getting connectivity setup just right and also seen others advising to follow one of the two above methods. Sometimes the recommendations are reported to work but other times the individual seeking help states that they still cannot establish connectivity.

I’ve been tinkering with this for months and have several times fallen into a state where I have followed every step but things fail to work. This technology is fairly young and still, IMHO rather fragile. Usually the fix is something like rebooting the host or guest, disabling/enabling one of the adapters, fiddling with the network bindings (YUCK!), or toggling the network sharing on or off. None of these solutions inspire much confidence, but sometimes the answer to which approach works best is whichever approach simply works for you.

Fragility Aside, what are some of the nuances of each

The Bridged External Switch is the more stable

My personal experience is that the bridged network is more stable and the connectivity is the most “full featured.” I did go through a bout of having to reset the bridged connection and rebinding its IPv4 and IPv6 bindings after each reboot or sleep cycle. That was quite annoying and I eventually wrote this script to automate the process:

function Reset-NetAdapters {    $bindings = @(        "Client for Microsoft Networks",        "Internet Protocol Version 6 (TCP/IPv6)",        "Internet Protocol Version 4 (TCP/IPv4)"        )    $bindings | %{ Enable-NetAdapterBinding -Name "Network Bridge" -DisplayName $_ }    Disable-NetAdapter "vEthernet (Virtual Switch)"    Enable-NetAdapter "vEthernet (Virtual Switch)"}

When I installed the Windows 8.1 preview that went away but I honestly think that was more the fault of an OS overhaul than windows 8.1 specifically.

This also seems to be the “official” or “supported” approach. It was even mentioned in Stephen Sinofsky’s blog.

The Internal switch can be unreliable but adds some privacy

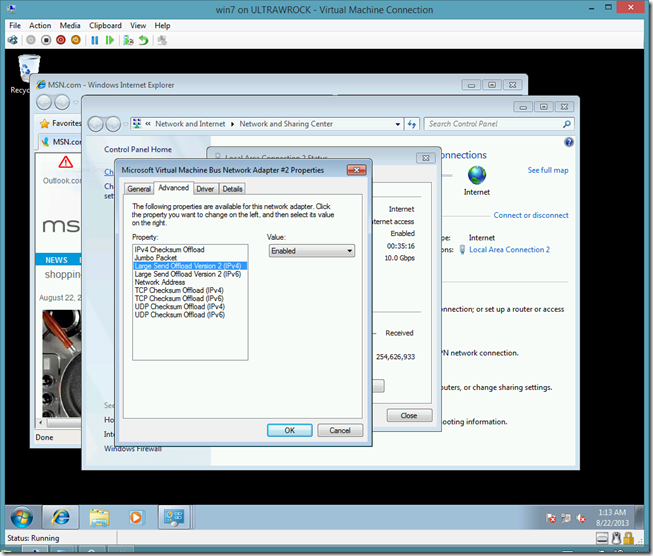
If you simply want to access the web or access files on the host, the connectivity provided here should be fine. However I did run into some odd bumps. For example, windows updates did not work at first until I discovered this very cryptic fix: on the guest NIC, go to the advanced configuration settings and disable the “Large Send Offload” settings for both IPv4 and IPv6.

offload


Also, while this allows your guest VM to access the outside world, the outside world cannot see it. This can be good or bad depending on how you want to use the VM. The benefit is some added security. The VM is not actually on the external network and therefore others in your network cannot ping it or access its shares. But then maybe that is exactly what you want to do. This is basically using NAT (network address translation) and assigns the guest VM its own address when transmitting communication outside of the internal network. This is the default networking method used by VirtualBox and is most convenient if you have a limited number of IP addresses and don’t want to assign a separate address to every device.

Hopefully you have found this usefull and especially if you are suffering from good old 0x8000FFFF, the SEO gods have provided you a solution more quickly than it took me to find.

Automate Codeplex Releases in your Powershell build and deployment scripts by Matt Wrock

codeplexI maintain a few projects on Codeplex.com and one that I have been working on actively lately is Boxstarter. A sort of “Add-On” to Chocolatey that allows you to run complex (or simple) environment scripts completely unattended in a reboot/logon resilient manner.

Whenever I startup any project that I plan to develop beyond a hack or a spike, the very first thing I do is lay down test infrastructure along with build and deployment automation. These are NOT “nice to haves” and especially since I devote my “free” time to these projects, it is important that I make the most of that time and spend as little time as possible chasing regression bugs or mucking with the Release gymnastics of packaging things up and copying/uploading files, etc. It is too easy to get that stuff wrong and takes too long to do and test every detail by hand every time I want to push bits - not to mention that it is just not fun.

When I push a Boxstarter release, my download zip, click-once app  and home page are updated on my Azure web site by doing a GIT Push to Master. My Chocolatey packages are packed and pushed by a deployment script. So the one manual step has been uploading ,my download zip file to Codeplex and creating a Codeplex Release for it. Well it ends up there is a web service that codeplex maintains to facilitate the automation of this step. It is a SOAP service and therefore a bit of a pain to call directly, but Codeplex also has a C# SDK that makes working with this service very easy.

While the SDK is a .Net Assembly that was likely intended for C# based clients, I prefer to write my build and deployment scripts in Powershell. I believe that what happens in a deployment should be easily discoverable and that the script should serve as the “deployment document.” Compiled code does not lend itself well to that kind of transparency. I also don’t like to use XML for control flow and therefore avoid msbuild for all but the basic compile tasks. PSake is a great powershell tool I have been using for years to organize and execute build and deployment scripts. Every build task is encapsulated by a Powershell function called Task. Here is my Push-Codeplex task:

Task Push-Codeplex { Add-Type -Path ` "$basedir\BuildScripts\CodePlexClientAPI\CodePlex.WebServices.Client.dll" $releaseService=New-Object CodePlex.WebServices.Client.ReleaseService $releaseService.Credentials = Get-Credential `   -Message "Codeplex credentials"`   -username "mwrock" $releaseService.CreateARelease(`     "boxstarter",`     "Boxstarter $version",`     "Running the Setup.bat file will install Chocolatey if not present `      and then install the Boxstarter modules.", `     [DateTime]::Now,[CodePlex.WebServices.Client.ReleaseStatus]::Beta,`     $true,`     $true) $releaseFile = New-Object CodePlex.WebServices.Client.releaseFile $releaseFile.Name="Boxstarter $version" $releaseFile.MimeType="application/zip" $releaseFile.FileName="boxstarter.$version.zip" $releaseFile.FileType=`   [CodePlex.WebServices.Client.ReleaseFileType]::RuntimeBinary $releaseFile.FileData=[System.IO.File]::ReadAllBytes(`   "$basedir\BuildArtifacts\Boxstarter.$version.zip") $fileList=new-object `   "System.Collections.Generic.List``1[[CodePlex.WebServices.Client.ReleaseFile]]" $fileList.Add($releaseFile) $releaseService.UploadReleaseFiles("boxstarter", "Boxstarter $version", $fileList)}

This adds the types in the Codeplex.Webservices.Client assembly to the current Powershell session. I have downloaded  the SDK and put it in my source tree. Its too bad this is not packaged in its own Nuget package. Then I could use Package Restore to grab the bits from Nuget.org.

Note that this assembly has a dependency on a couple Build assemblies. You could try to track these down separately but since I have Visual Studio installed, this gives me these dependencies.

The parent object handling all codeplex project commands takes a ICredentials to authenticate the client. I can simply use Get-Credential for this. This does require me to manually enter my password but that is fine for my script.If you had a more enterprise grade deployment that needed to fully script the authentication, that is very possible. After that I am free to create my release, and upload my file. This worked flawlessly for my project and now I can deploy my project with a single command.