 A couple weeks ago I released Boxstarter v2.2. The primary feature added is the ability to target Hyper-V VMs. Boxstarter can automatically configure them without any manual setup and can both save and restore checkpoints. You can learn about the details here. I’d like to give a big thanks to Gary Park (@gep13) for providing early feedback and helping me catch some holes I needed to fill in to make this release a better user experience. I’m sure I have not identified the last of them so please, create an issue or discussion on the Codeplex site if you run into issues.
This post will discuss how you can use this new feature to greatly reduce the friction involved in Chocolatey package development or in the creation of Boxstarter-style chocolatey packages to develop Windows environments leveraging Hyper-V VMs. No additional Windows licenses will be required. More on that later.
NOTE: Both the Boxstarter.HyperV PowerShell module and Microsoft’s Hyper-V module require PowerShell version 3 or higher on the VM host. This is automatically available on Windows 8 and server 2012. On Windows 2008 R2, it can be installed via the Windows Management Framework.
Integration testing for Chocolatey packages
When you are authoring a Chocolatey package, you are likely creating something that changes the state of the machine upon which the package is installed. It may simply install a single piece of software or it may install several pieces of software along with various dependencies and possibly configure services, firewall port rules, IIS sites, databases, etc. As the package author you want to make sure that the package can run and perform the installation reliably and repeatably and perhaps on a variety of OS versions. This is almost impossible to test directly on your dev environment.
You want one or more virtual environments that can be started in a clean state that mimics what you imagine most others will have when they download and install your package. Furthermore, as you work out the kinks of your package, you want to be able to start over again and again and again. Virtual machines make this workflow possible.
Hyper-V VM technology, there is a good chance you already have it
There are lots of great VM solutions out there. Besides the cloud solutions provided by Amazon, Microsoft Azure, Rackspace and others, VMWare, Hyper-V and Virtual Box are some very popular non cloud options. Hyper-V is Microsoft’s solution. If you have Windows 8 Pro or greater or Windows 2012 or 2008 R2, this technology is available to you for free. I run Windows 8.1 Pro on a Lenovo X1 laptop with 8GB and can usually have 3 VMs running simultaneously. It works very well.
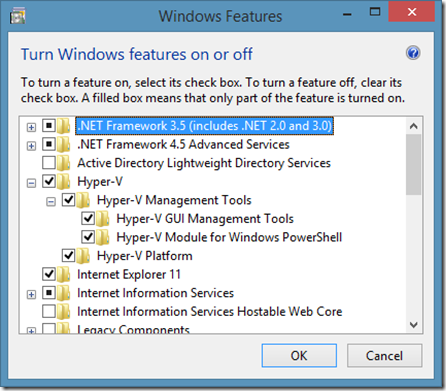
Simply enable the Hyper-V features on your machine either using the “Turn Windows features on or off” GUI
or from a command line running:
dism.exe /Online /Enable-Feature:Microsoft-Hyper-V /All
dism.exe /Online /Enable-Feature:Microsoft-Hyper-V-Management-PowerShell
Creating the VM
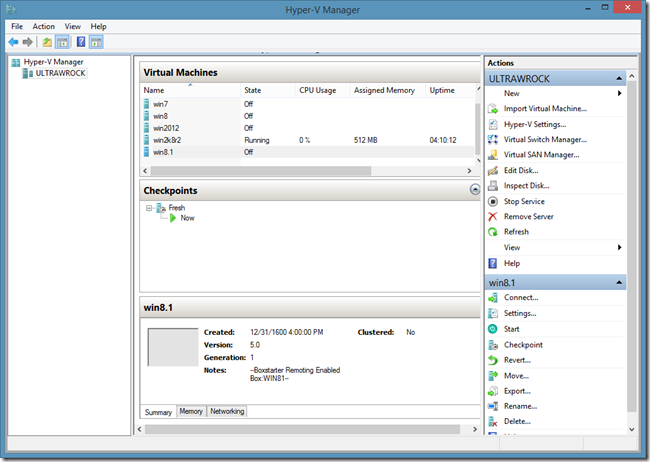
The first thing you need to do is create one or more VMs to reproduce the environment you are targeting. Developing Boxstarter, I have 5 VMs:
I have one for every Windows version I care to test on. I save the VM with a base os install with no configuration tweaks other than maybe changing the computer name and adding a admin user. I want to have Windows with the default settings. The first thing you need to get started creating a VM, is a VHD. That is the file type that Hyper-V uses to store the machine. That’s really all a VM is. It’s a file. It can get much more complicated with different VHD formats, differencing disks, Fixed disks, Dynamically growing disks, etc. I’m not going to get into that here and it is not necessary to understand for what I’m going to show you. However if you find yourself working with VMs a lot and want to learn how to maintain them efficiently, you will want to look into those details.
There are two main ways that I typically create a clean Windows VHD:
Create a new VHD and mount a Windows Install ISO as a DVD drive
If you have a Windows installation ISO file, you can mount this to the VM as a virtual DVD drive. Remember those? You need to create an empty VHD file which represents a system with no OS installed. The VM will boot from the virtual DVD and walk you through the Windows Install wizard. This can all be done through the Hyper-V GUI or from PowerShell:
New-VM -Name "myVM" -MemoryStartupBytes 1GB -NewVHDPath "D:\VHDs\w81.vhdx" -NewVHDSizeBytes 60GB
Set-VMDvdDrive -VMName myVM -Path "C:\ISOs\EVAL_EN-US-IRM_CENA_X64FREE_EN-US_DV5.iso"
Start-VM "myVM"
Once I complete the Windows installation and rename the computer, I create a checkpoint so that I can always snap to the point in time when windows had absolutely no additional configuration beyond installation and computer rename.
Checkpoint-VM -Name "myVM" -SnapshotName "BareOS"
Create a new VM from an existing base OS VHD
After performing the above procedure from an ISO, I like to “freeze” the VHD of the newly installed OS. To do this, I create a differencing disk of that VHD and mark the original VHD as read only. Now I can create new VMs based on the differencing disk that contains only the difference of the fresh install and all subsequent work. Here, I’ll create a differencing VHD based on the VHD we created for our new VM above and then we will attach it to the new VM:
Stop-VM myVM
New-VHD -Path "D:\VHDs\w81diff.vhdx" -ParentPath "D:\VHDs\w81.vhdx" -Differencing
Set-VMHardDiskDrive -VMName myvm -Path "D:\VHDs\w81diff.vhdx"
Start-VM myVM
Downloading evaluation versions of Windows installers
You don't need a purchased copy of Windows or a fancy shmancy MSDN subscription to get a Windows OS for testing purposes. As of this posting, anyone can download evaluation copies of Windows 8.1, Server 2008 R2 and 2012 R2. The evaluation period is between 90 and 180 days depending on the version you download. In addition to the ISO, the server OS versions also provide an option to download VHD’s. These allow you to skip the OS installer. They come with a builtin Administrator account with a password set to Pass@word1. Convenient since that is the same password I use for all of my personal online accounts. When the evaluation expires, it is perfectly legal to simply start over from the original installer or VHD. Here are the current URLs you can use to download these evaluations:
Connecting the VM to the internet
While it is certainly possible and sometimes desirable to write Chocolatey packages that work fine offline, chances are that you want your VM to be able to access the world wide web. There are several ways to do this. For most “normal” dev environments, the following approach should work.
Get a listing of your Network Adapters:
C:\> Get-NetAdapter

Name                      InterfaceDescrip                        ifIndex Status                                                                          s
----                      --------------------                    ------- -----
Bluetooth Network Conn... Bluetooth Device (Personal Area Netw...       5 Di...
Wi-Fi                     Intel(R) Centrino(R) Advanced-N 6205          3 Up
Next add a “Virtual Switch” that binds to your actual network adapter. This only has to be done once on the VM host. The switch can be reused on all guests created on the host. After adding the switch, it can be applied to the VM:
New-VMSwitch -NetAdapterInterfaceName "Wi-Fi" -Name MySwitch
Set-VMSwitch -Name "myVM" -VMSwitch "MySwitch"
In my case, since I am using a wireless adapter, Hyper-V creates a network bridge and a new Hyper-V adapter that binds to the bridge and that any VM using this switch will use.
Getting Boxstarter
There are lots of ways to get the Boxstarter modules installed. If you have Chocolatey, just CINST Boxstarter. Otherwise, you can download the installer from either the codeplex site or Boxstarter.org and run the setup.bat in the zip file and then open a new PowerShell window. Since the Boxstarter.HyperV module requires at least PowerShell 3 which can auto load all modules in your PSModulePath and the Boxstarter installer adds the Boxstarter modules to that path, all Boxstarter commands should be available without needing to import any modules explicitly.
Tell Boxstarter where your packages are and build them
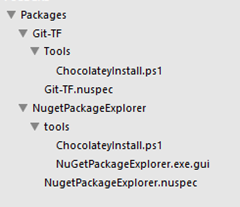
Perhaps the packages you want to test have not yet been pushed to a nuget feed and you want to test the local development version. Boxstarter provides several commands to make creating packages simple. See the boxstarter docs for details. We’ll assume that we have pulled our package repository from source control to a local Packages directory. It has two packages:
Now we will tell Boxstarter where our local packages are stored by changing Boxstarter’s localRepo setting from the default BuildPackages folder in Boxstarter’s module directory to our package directory.
C:\dev\Packages> Set-BoxstarterConfig –LocalRepo .
C:\dev\Packages> $Boxstarter

Name                           Value
----                           -----
IsRebooting                    False
NugetSources                   http://chocolatey.org/api/v2;http://www.myget...
BaseDir                        C:\Users\Matt\AppData\Roaming\Boxstarter
LocalRepo                      C:\dev\packages
RebootOk                       True
Log                            C:\Users\Matt\AppData\Local\Boxstarter\boxsta...
SuppressLogging                False
Checking the $Boxstarter variable that holds our boxstarter settings confirms that Boxstarter is tracking our local repository where we are currently working.
Now Boxstarter can build our packages by using the Invoke-BoxstarterBuild command:
C:\dev\Packages> Invoke-BoxStarterBuild -all
Boxstarter: Scanning C:\dev\packages for package folders
Boxstarter: Found directory Git-TF. Looking for Git-TF.nuspec
Calling 'C:\Chocolatey\chocolateyinstall\nuget.exe pack .\Git-TF\Git-TF.nuspec -NoPackageAnalysis'.
Attempting to build package from 'Git-TF.nuspec'.
Successfully created package 'C:\dev\packages\Git-TF.2.0.2.20130214.nupkg'.

Your package has been built. Using Boxstarter.bat Git-TF or Install-BoxstarterPackage Git-TF will run this package.
Boxstarter: Found directory NugetPackageExplorer. Looking for NugetPackageExplorer.nuspec
Calling 'C:\Chocolatey\chocolateyinstall\nuget.exe pack .\NugetPackageExplorer\NugetPackageExplorer.nuspec -NoPackageAnalysis'.
Attempting to build package from 'NugetPackageExplorer.nuspec'.
Successfully created package 'C:\dev\packages\NugetPackageExplorer.3.7.0.20131203.nupkg'.

Your package has been built. Using Boxstarter.bat NugetPackageExplorer or Install-BoxstarterPackage NugetPackageExplorer will run this package.
This iterates all folders in our local repo and creates the .nupkg files for all our package nuspec files. Note that if we do not want to build every package we could specify a single package to build:
C:\dev\Packages> Invoke-BoxStarterBuild -Name Git-TF
Testing the packages in your VMs
Now we are ready to test our packages. Unless the package is incredibly trivial, I like to test on at least a PowerShell 2 and a Powershell 3 (or 4) environment since there are some unobvious incompatibilities between v2 and post v2 versions. We will test against Server 2012 and Server 2008 R2. We can pipe our VM names to Boxstarter’s Enable-BoxstarterVM command which will inspect the VM and ensure that Boxstarter can connect to the VM using PowerShell remoting. If it can not, Boxstarter will manipulate the VM machine’s registry settings in its VHD to enable WMI Firewall rules which will allow Boxstarter to connect and enable PowerShell remoting. We will also ask Boxstarter to restore a checkpoint (named “fresh”) that we previously set which brings the VM to a clean state.
After ensuring that it can establish connections to the VMs, Boxstarter copies the Boxstarter modules and the local repository nupkg files to the VM. Then Boxstarter initiates the installation of the package on the VM.
So lets have Boxstarter test a package out on our VMs and analyze the console output.
C:\dev\Packages> "win2012","win2k8r2" | Enable-BoxstarterVM
-Credential $c -CheckpointName fresh | Install-BoxstarterPackage -PackageName NugetPackageExplorer -Force
Boxstarter: fresh restored on win2012 waiting to complete...
Boxstarter: Configuring local Powershell Remoting settings...
Boxstarter: Testing remoting access on win2012...
Boxstarter: Testing WSMAN...
Boxstarter: fresh restored on win2k8r2 waiting to complete...
Boxstarter: Configuring local Powershell Remoting settings...
Boxstarter: Testing remoting access on WIN-HNB91NNAB2G...
Boxstarter: Testing WSMAN...
Boxstarter: Testing WMI...
Here I pipe the names of my VMs to Boxstarter’s Enable-BoxstarterVM command. I have a checkpoint named “fresh” which is my “clean” state so Boxstarter will restore that checkpoint before proceeding. The result of Enable-BoxstarterVM, which is the computer name and credentials of my VMs, is piped to Install-BoxstarterPackage which will perform the package installation.
We can see that Boxstarter checks WSMan, the protocol used by PowerShell remoting, and if that is not enabled it also checks WMI. Windows 2012 has PowerShell remoting enabled by default so there is no need to check WMI, but Server 2008 R2, does not have PowerShell remoting enabled and thus checks for WMI. I am using the built-in administrator account and WMI is accessible. Therefore Boxstarter does not need to make any adjustments to the VM’s registry. If WMI was not accesible or if I was using a local user, Boxstarter would need to edit the registry and enable the WMI ports and also enable LocalAccountTokenFilterPolicy for the local user.
Also note that the 2008 R2 VM has a different computer name than the VM Name, WIN-HNB91NNAB2G. Boxstarter will find the DNS name of the VM and pass that on to the Install-BoxstarterPackage command which needs that to establish the remote connection.
Boxstarter Version 2.2.56
(c) 2013 Matt Wrock. http://boxstarter.org

Boxstarter: Configuring local Powershell Remoting settings...
Boxstarter: Configuring CredSSP settings...
Boxstarter: Testing remoting access on win2012...
Boxstarter: Remoting is accesible on win2012
Boxstarter: Copying Boxstarter Modules and local repo packages at C:\dev\Packages to C:\Users\Matt\AppData\Local\Temp on win2012...
Boxstarter: Creating a scheduled task to enable CredSSP Authentication on win2012...
Here Boxstarter begins the install on win2012. It determines that remoting to the VM is accessible, copies the Boxstarter modules and the local packages and enables CredSSP (using CredSSP allows Boxstarter packages to access other remote resources that may need the user’s credentials like network shares).
[WIN2012]Boxstarter: Installing package 'NugetPackageExplorer'
[WIN2012]Boxstarter: Disabling Automatic Updates from Windows Update
[WIN2012]Boxstarter: Chocolatey not instaled. Downloading and installing...
[WIN2012]+ Boxstarter starting Calling Chocolatey to install NugetPackageExplorer. This may take several minutes to complete...
Chocolatey (v0.9.8.23) is installing 'NugetPackageExplorer' and dependencies. By installing you accept the license for 'NugetPackageExplorer' and each dependency you are installing.
______ DotNet4.5 v4.5.20120822 ______
Microsoft .Net 4.5 Framework is already installed on your machine.
______ NugetPackageExplorer v3.7.0.20131203 ______
Downloading NugetPackageExplorer 64 bit (https://github.com/mwrock/Chocolatey-Packages/raw/master/NugetPackageExplorer/NpeLocalExecutable.zip) to C:\Users\ADMINI~1\AppData\Local\Temp\chocolatey\NugetPackageExplorer\NugetPackageExplorerInstall.zip
Extracting C:\Users\ADMINI~1\AppData\Local\Temp\chocolatey\NugetPackageExplorer\NugetPackageExplorerInstall.zip to C:\Chocolatey\lib\NugetPackageExplorer.3.7.0.20131203...
NugetPackageExplorer has finished successfully! The chocolatey gods have answered your request!
'C:\Chocolatey\lib\NugetPackageExplorer.3.7.0.20131203\NugetPackageExplorer.exe' has been linked as a shortcut on your desktop
File association not found for extension .nupkg
    + CategoryInfo          : NotSpecified: (File associatio...xtension .nupkg
   :String) [], RemoteException
    + FullyQualifiedErrorId : NativeCommandError
    + PSComputerName        : win2012

Elevating Permissions and running C:\Windows\System32\WindowsPowerShell\v1.0\powershell.exe -NoProfile -ExecutionPolicy unrestricted -Command "& import-module -name  'C:\Chocolatey\chocolateyinstall\helpers\chocolateyInstaller.psm1'; try{cmd /c assoc .nupkg=Nuget.Package; start-sleep 6;}catch{write-error 'That was not
sucessful';start-sleep 8;throw;}". This may take awhile, depending on the statements.
Elevating Permissions and running C:\Windows\System32\WindowsPowerShell\v1.0\powershell.exe -NoProfile -ExecutionPolicy unrestricted -Command "& import-module -name  'C:\Chocolatey\chocolateyinstall\helpers\chocolateyInstaller.psm1'; try{cmd /c ftype Nuget.Package="C:\Chocolatey\lib\NugetPackageExplorer.3.7.0.20131203\NugetPackageExplorer.exe" %1; start-sleep 6;}catch{write-error 'That was not sucessful';start-sleep 8;throw;}". This may take awhile, depending on the statements.
NuGet Package Explorer has finished successfully! The chocolatey gods have answered your request!
Adding C:\Chocolatey\bin\NuGetPackageExplorer.bat and pointing to '%DIR%..\lib\nugetpackageexplorer.3.7.0.20131203\nugetpackageexplorer.exe'.
Adding C:\Chocolatey\bin\NuGetPackageExplorer and pointing to '%DIR%..\lib\nugetpackageexplorer.3.7.0.20131203\nugetpackageexplorer.exe'.
Setting up NuGetPackageExplorer as a non-command line application.
Finished installing 'NugetPackageExplorer' and dependencies - if errors not shown in console, none detected. Check log for errors if unsure.
[WIN2012]+ Boxstarter finished Calling Chocolatey to install NugetPackageExplorer. This may take several minutes to complete... 00:00:31.8857706
[WIN2012]Boxstarter: Enabling Automatic Updates from Windows Update

Errors       : {File association not found for extension .nupkg}
ComputerName : win2012
Completed    : True
FinishTime   : 12/28/2013 1:05:13 AM
StartTime    : 12/28/2013 1:04:00 AM
Now we see mostly what we would expect to see if we were doing a vanilla CINST via Chocolatey. What is noteworthy here is that Boxstarter outputs an object to the pipeline for each VM. This object holds basic metadata regarding the installation including any errors encountered. In our case, the installation did produce one non-terminating error. Overall the install is successful.
Now Boxstarter moves on to the Server 2008 R2 VM.
Boxstarter: Testing remoting access on WIN-HNB91NNAB2G...
Boxstarter: Enabling Powershell Remoting on WIN-HNB91NNAB2G
Boxstarter: PowerShell Remoting enabled successfully
Boxstarter: Copying Boxstarter Modules and local repo packages at C:\dev\Packages to C:\Users\Matt\AppData\Local\Temp on WIN-HNB91NNAB2G...
Boxstarter: Creating a scheduled task to enable CredSSP Authentication on WIN-HNB91NNAB2G...
This is slightly different from the Server 2012 install. PowerShell remoting was not initially enabled on Windows 2008 R2; so Boxstarter needed to enable it before it could copy over the Boxstarter modules and local packages.
[WIN-HNB91NNAB2G]Boxstarter: Installing package 'NugetPackageExplorer'
[WIN-HNB91NNAB2G]Boxstarter: Disabling Automatic Updates from Windows Update
[WIN-HNB91NNAB2G]Boxstarter: Downloading .net 4.5...
[WIN-HNB91NNAB2G]Boxstarter: Installing .net 4.5...
[WIN-HNB91NNAB2G]Boxstarter: Chocolatey not instaled. Downloading and installing...

[WIN-HNB91NNAB2G]Boxstarter: Enabling Automatic Updates from Windows Update
[WIN-HNB91NNAB2G]Boxstarter: Restart Required. Restarting now...
Boxstarter: Waiting for WIN-HNB91NNAB2G to sever remote session...
Boxstarter: Waiting for WIN-HNB91NNAB2G to respond to remoting...
Next is more activity that we did not see on Server 2012. Server 2008 R2 comes with .Net 2.0 installed. Chocolatey needs at least 4.0 and Boxstarter will install v4.5 if v4.0 is not installed since v4.5 is an “in place upgrade” from 4.0 and thus includes 4.0. After installing .Net4.5 and Chocolatey, there is a pending reboot. Boxstarter needs to reboot the VM before proceeding with the install in order to reduce the risk of a failed install.
The remainder of the Server 2008 R2 install is identical to the Server 2012 install and so we will not examine the rest of the output.
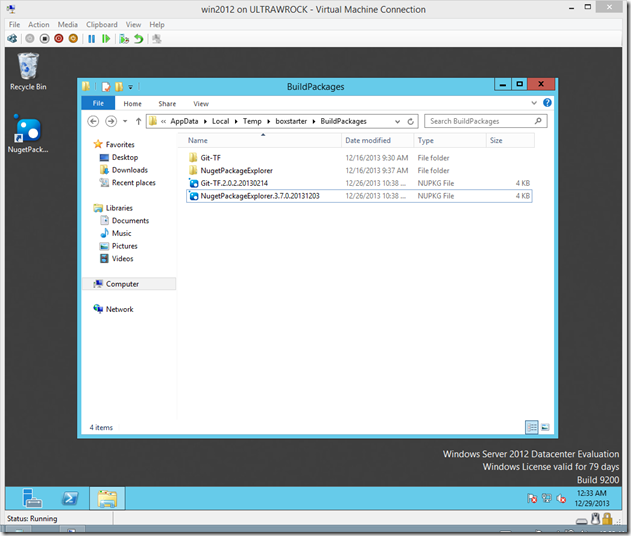
Now your VMs should have the NugetPacketExplorer installed and all *.Nupkg files should be associated with that application.
Creating Checkpoints
In the Enable-BoxstarterVM call we saw above, we restored to a known clean state that we had previously saved. However, we can also have Boxstarter create the clean state. In the example we used above, we hade a checkpoint named “fresh” that Boxstarter restored. If that checkpoint did not exist, Boxstarter would have created one just after exiting Enable-BoxstarterVM.
Rolling package testing into Continuous Integration
This post shows you how you can use Boxstarter and Hyper-V to create an environment where you can easily test package development. However, wouldn’t it be great to take this to the next level and have your package checkins automatically kickoff a package install on a Azure or AWS VM? My next post will explore just that which will be possible when I release the Windows Azure integration.


