
I personally use Hyper-V as my hypervisor on windows, but I use VirtualBox on my Ubuntu work laptop so it is convenient for me to create boxes in both formats . However it is a major headache to do so especially when preparing Windows images. I either have to run through creating the image twice (once for VirtualBox and again for Hyper-V) or I have to copy multi gigabyte files across my computers and then convert them.
This post will demonstrate how to automate the conversion of a VirtualBox disk image to a Hyper-V compatible VHD and create a Vagrant .box file that can be used to fire up a functional Hyper-V VM. This can be entirely done on a machine without Hyper-V installed or enabled. I will be demonstrating on a Windows box using Powershell scripts but the same can be done on a linux box using bash.
The environment
You cannot have VirtualBox and Hyper-V comfortably coexist on the same machine. I have Hyper-V enabled on my personal windows laptop and I needed some "bare metal" to install VirtualBox. Well as luck had it, I was able to salvage my daughter's busted old laptop. Its video is hosed which is just fine for my purposes. I'll be running it as a headless VM host. Here is how I set it up:
- Repaved with Windows 8.1 with Update 1 Professional, fully patched
- Enabled RemoteDesktop
- Installed VirtualBox, Vagrant, and Packer with Chocolatey
Of course I used Boxstarter to set it all up. After all I was not born in a barn.
Creating the VirtualBox image
I am currently working on another post (hopefully due to publish this week) that will go into detail on creating Windows images with Packer and Boxstarter and cover many gory details around, unattend.xml files, sysprep, and tips to get the image as small as possible. This post will not cover the creation of the image. However, if you are interested in this topic, I'm assuming you are able to create a VirtualBox VM. That is all you need to do to get started here. Guest OS does not matter. You just need to get a .VDI or .VMDK file generated which is what automatically happens when you create a VirtualBox VM.
Converting the virtual hard disk to VHD
This is a simple one liner using VBoxManage.exe which installs with VirtualBox. You just need the path to the VirtualBox VM's hard disk.
$vboxDisk = Resolve-Path "$baseDir\output-virtualbox-iso\*.vmdk"
$hyperVDir = "$baseDir\hyper-v-output\Virtual Hard Disks"
$hyperVDisk = Join-Path $hyperVDir 'disk.vhd'
$vbox = "$env:programfiles\oracle\VirtualBox\VBoxManage.exe"
.$vbox clonehd $vboxDisk $hyperVDisk --format vhd
This uses the clonehd command and takes the location of the VirtualBox disk and the path of the vhd to be created. The vhd --format is also supplied. The conversion takes a few minutes to complete on my system.
Note that this may likely produce a vhd file that is much larger than the vmdk or vdi image from which the conversion took place. Thats OK. My 3.8GB vmdk produced a 9GB vhd. This is simply because the VHD is uncompressed and we'll take care of that in the last step. It is highly advisable that you "0 out" all unused disk space as the last step of the image creation to assist the compression. On windows images, the sysinterals tool sdelete does a good job at that.
Laying out the Hyper-V and Vagrant metadata
So you now have a vhd file that can be sucked into any Hyper-V VM. However, just the vhd alone is not enough for Vagrant to produce a Hyper-V VM. There are 2 key bits that we need to create: A Hyper-V xml file that defines the VM metadata and vagrant metadata json as well as an optional Vagrantfile. These all have to be archived in a specific folder structure.
The Hyper-V XML
Prior to Windows 10, Hyper-V stored virtual machine metadata in an XML file. Vagrant expects this XML file and inspects it for several bits of metadata that it uses to create a new VM when you "vagrant up". Its still completely compatible with Windows 10 since Vagrant will simply use the Hyper-V Powershell cmdlets to create a new VM. However, it does mean that exporting a windows 10 Hyper-V vm will no longer produce this xml file. Instead it produces two binary files in vmcx and vmrx formats that are no longer readable or editable. However, if you so happen to have access to a xml vm file exported from v8.1/2012R2 or earlier, you can still use that.
Here I am using just that. A xml file exported from a 2012R2 VM. Its fairly large so I will not display it in its entirety here but you can view it on github here. You can edit things like vm name, available ram, switches, etc. This one should be compatible out of the box on any Hyper-V host. The most important thing is to make sure that the file name of the hard disk vhd referenced in this metadata matches the filename of the vhd you produced above. Here is the disk metadata:
<controller0>
  <drive0>
   <iops_limit type="integer">0</iops_limit>
    <iops_reservation type="integer">0</iops_reservation>
    <pathname type="string">C:\dev\vagrant\Win2k12R2\.vagrant\machines\default\hyperv\disk.vhd</pathname>
    <persistent_reservations_supported type="bool">False</persistent_reservations_supported>
    <type type="string">VHD</type>
    <weight type="integer">100</weight>
  </drive0>
  <drive1>
    <pathname type="string"></pathname>
    <type type="string">NONE</type>
  </drive1>
</controller0>
Another thing to take note of here is the "subtype" of the VM. This is known to most as the "generation." Later Hyper-V versions support both generation and one and two VMs. If you are from the future, there may be more. Typically vagrant boxes will do fine on generation 1 and will also be more portable and accessible to older hosts so I make sure this is specified.
<properties>
  <creation_time type="bytes">j3iz2977zwE=
</creation_time>
  <global_id type="string">0AA394FA-7C4A-4070-BA32-773D43B28A68</global_id>
  <highly_available type="bool">False</highly_available>
  <last_powered_off_time type="integer">130599959406707888</last_powered_off_time>
  <last_powered_on_time type="integer">130599954966442599</last_powered_on_time>
  <last_state_change_time type="integer">130599962187797355</last_state_change_time>
  <name type="string">2012R2</name>
  <notes type="string"></notes>
  <subtype type="integer">0</subtype>
  <type_id type="string">Virtual Machines</type_id>
  <version type="integer">1280</version>
</properties>
Again, its the subtype that is of relevance here. 0 is generation 1. Also, here is where you would change the name of the vm if desired.
If you are curious about exactly how Vagrant parses this file to produce a VM. Here is the powershell that does that. I dont think there is any reason why this same xml file would not work for other OSes but you would probably want to change the vm name. In a bit, I'll show you where this file goes.
Vagrant metadata.json
This is super simple but 100% required. The packaged vagrant box file needs a metadata.json file in its root. Here are the exact contents of the file:
{
  "provider": "hyperv"
}
Optional Vagrantfile
This is not required but especially for windows boxes it may be helpful to include an embedded Vagrantfile. If you are familiar with vagrant, you know that the Vagrantfile contains all of the config data for your vagrant box. Well if you package a Vagrantfile with the base box as I will show here, the config in this file will be inherited by any Vagrantfile that consumes this box. Here is what I typically add to windows images:
# -*- mode: ruby -*-
# vi: set ft=ruby :

Vagrant.configure(2) do |config|
  config.vm.guest = :windows
  config.vm.communicator = "winrm"

  config.vm.provider "virtualbox" do |vb|
    vb.gui = true
    vb.memory = "1024"
  end

  config.vm.provider 'hyperv' do |hv|
    hv.ip_address_timeout = 240
  end
end
First, this is pure ruby. That likely does not matter at all and those of you unfamiliar with ruby hopefully groc what this file is specifying, but if you want to go crazy with ifs, whiles, and dos, go right ahead.
I find this file provides a better windows experience accross the board by specifying the following:
- As long as winrm is enabled on the base image vagrant can talk to it on the right port.
- VirtualBox will run the vm in a GUI console
- Hyper-V typically takes more than 2 minutes to become accesible and this prevents timeouts.
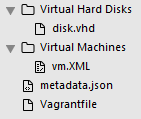
Laying out the files
Here is how all of these files should be structured in the end:
Creating the .box file
In the end vagrant consumes a tar.gz file with a .box extension. We will use 7zip to create this file.
."$env:chocolateyInstall\tools\7za.exe" a -ttar package-hyper-v.tar hyper-v-output\*
."$env:chocolateyInstall\tools\7za.exe" a -tgzip package-hyper-v.box package-hyper-v.tar
If you have chocolatey installed, Rejoice! you already have 7zip. If you do not have chocolatey, you should feel bad.
This simply creates the tar archive and then compacts it. It takes about 20 minutes on my machine.
Testing the box
Now copy the final box file to a machine that runs Hyper-V and has vagrant installed.
C:\dev\vagrant\Win2k12R2\exp\Win-2012R2> vagrant box add test-box .\package-hyper-v.box
==> box: Box file was not detected as metadata. Adding it directly...
==> box: Adding box 'test-box' (v0) for provider:
    box: Unpacking necessary files from: file://C:/dev/vagrant/Win2k12R2/exp/Win-2012R2/package-hyper-v.box
    box: Progress: 100% (Rate: 98.8M/s, Estimated time remaining: --:--:--)
==> box: Successfully added box 'test-box' (v0) for 'hyperv'!
C:\dev\vagrant\Win2k12R2\exp\Win-2012R2> vagrant init test-box
A `Vagrantfile` has been placed in this directory. You are now
ready to `vagrant up` your first virtual environment! Please read
the comments in the Vagrantfile as well as documentation on
`vagrantup.com` for more information on using Vagrant.
C:\dev\vagrant\Win2k12R2\exp\Win-2012R2> vagrant up
Bringing machine 'default' up with 'hyperv' provider...
==> default: Verifying Hyper-V is enabled...
==> default: Importing a Hyper-V instance
    default: Cloning virtual hard drive...
    default: Creating and registering the VM...
    default: Successfully imported a VM with name: 2012R2Min
==> default: Starting the machine...
==> default: Waiting for the machine to report its IP address...
    default: Timeout: 240 seconds
    default: IP: 192.168.1.11
==> default: Waiting for machine to boot. This may take a few minutes...
    default: WinRM address: 192.168.1.11:5985
    default: WinRM username: vagrant
    default: WinRM transport: plaintext
==> default: Machine booted and ready!
==> default: Preparing SMB shared folders...
    default: You will be asked for the username and password to use for the SMB
    default: folders shortly. Please use the proper username/password of your
    default: Windows account.
    default:
    default: Username: matt
    default: Password (will be hidden):
==> default: Mounting SMB shared folders...
    default: C:/dev/vagrant/Win2k12R2/exp/Win-2012R2 => /vagrant
Enjoy your boxes!